SuperPlacer Place Mode (Z)
A mode designed for fast, precise manual placement of actor counts that are too small to justify heavy procedural tools, but big enough to be painful with Unreal's traditional placement workflow. In a lot of cases it's faster to place actors ten times over with different variations using SuperPlacer Place Mode than it is to set up a heavy procedural pipeline.
SuperPlacer Transform Mode (X)
SuperPlacer's default mode, which lives on top of Unreal Engine's standard startup Selection Mode. It behaves the way Unreal Engine users expect, but comes with more advanced tools for manipulating actors that already exist on the level.
Virtual Pivot (C)
SuperPlacer's Virtual Pivot is your new helper and best friend when placing and manipulating actors on the level. It's a temporary pivot point — a parent for the selected actors, or for the preview actor in Place Mode — that helps you place actors conveniently, quickly and precisely. Basically it's a temporary stand-in for the pivot saved inside the actor: it only lives during placement, and can be snapped to any other position you need at that moment. Once the actor is placed on the level, the virtual pivot is not written back into the actor.
01 | Place vs Transform Mode
SuperPlacer has two main modes — Place and Transform — and a shared set of tools that work almost the same way whether you're placing new actors or transforming actors that already exist on the level.
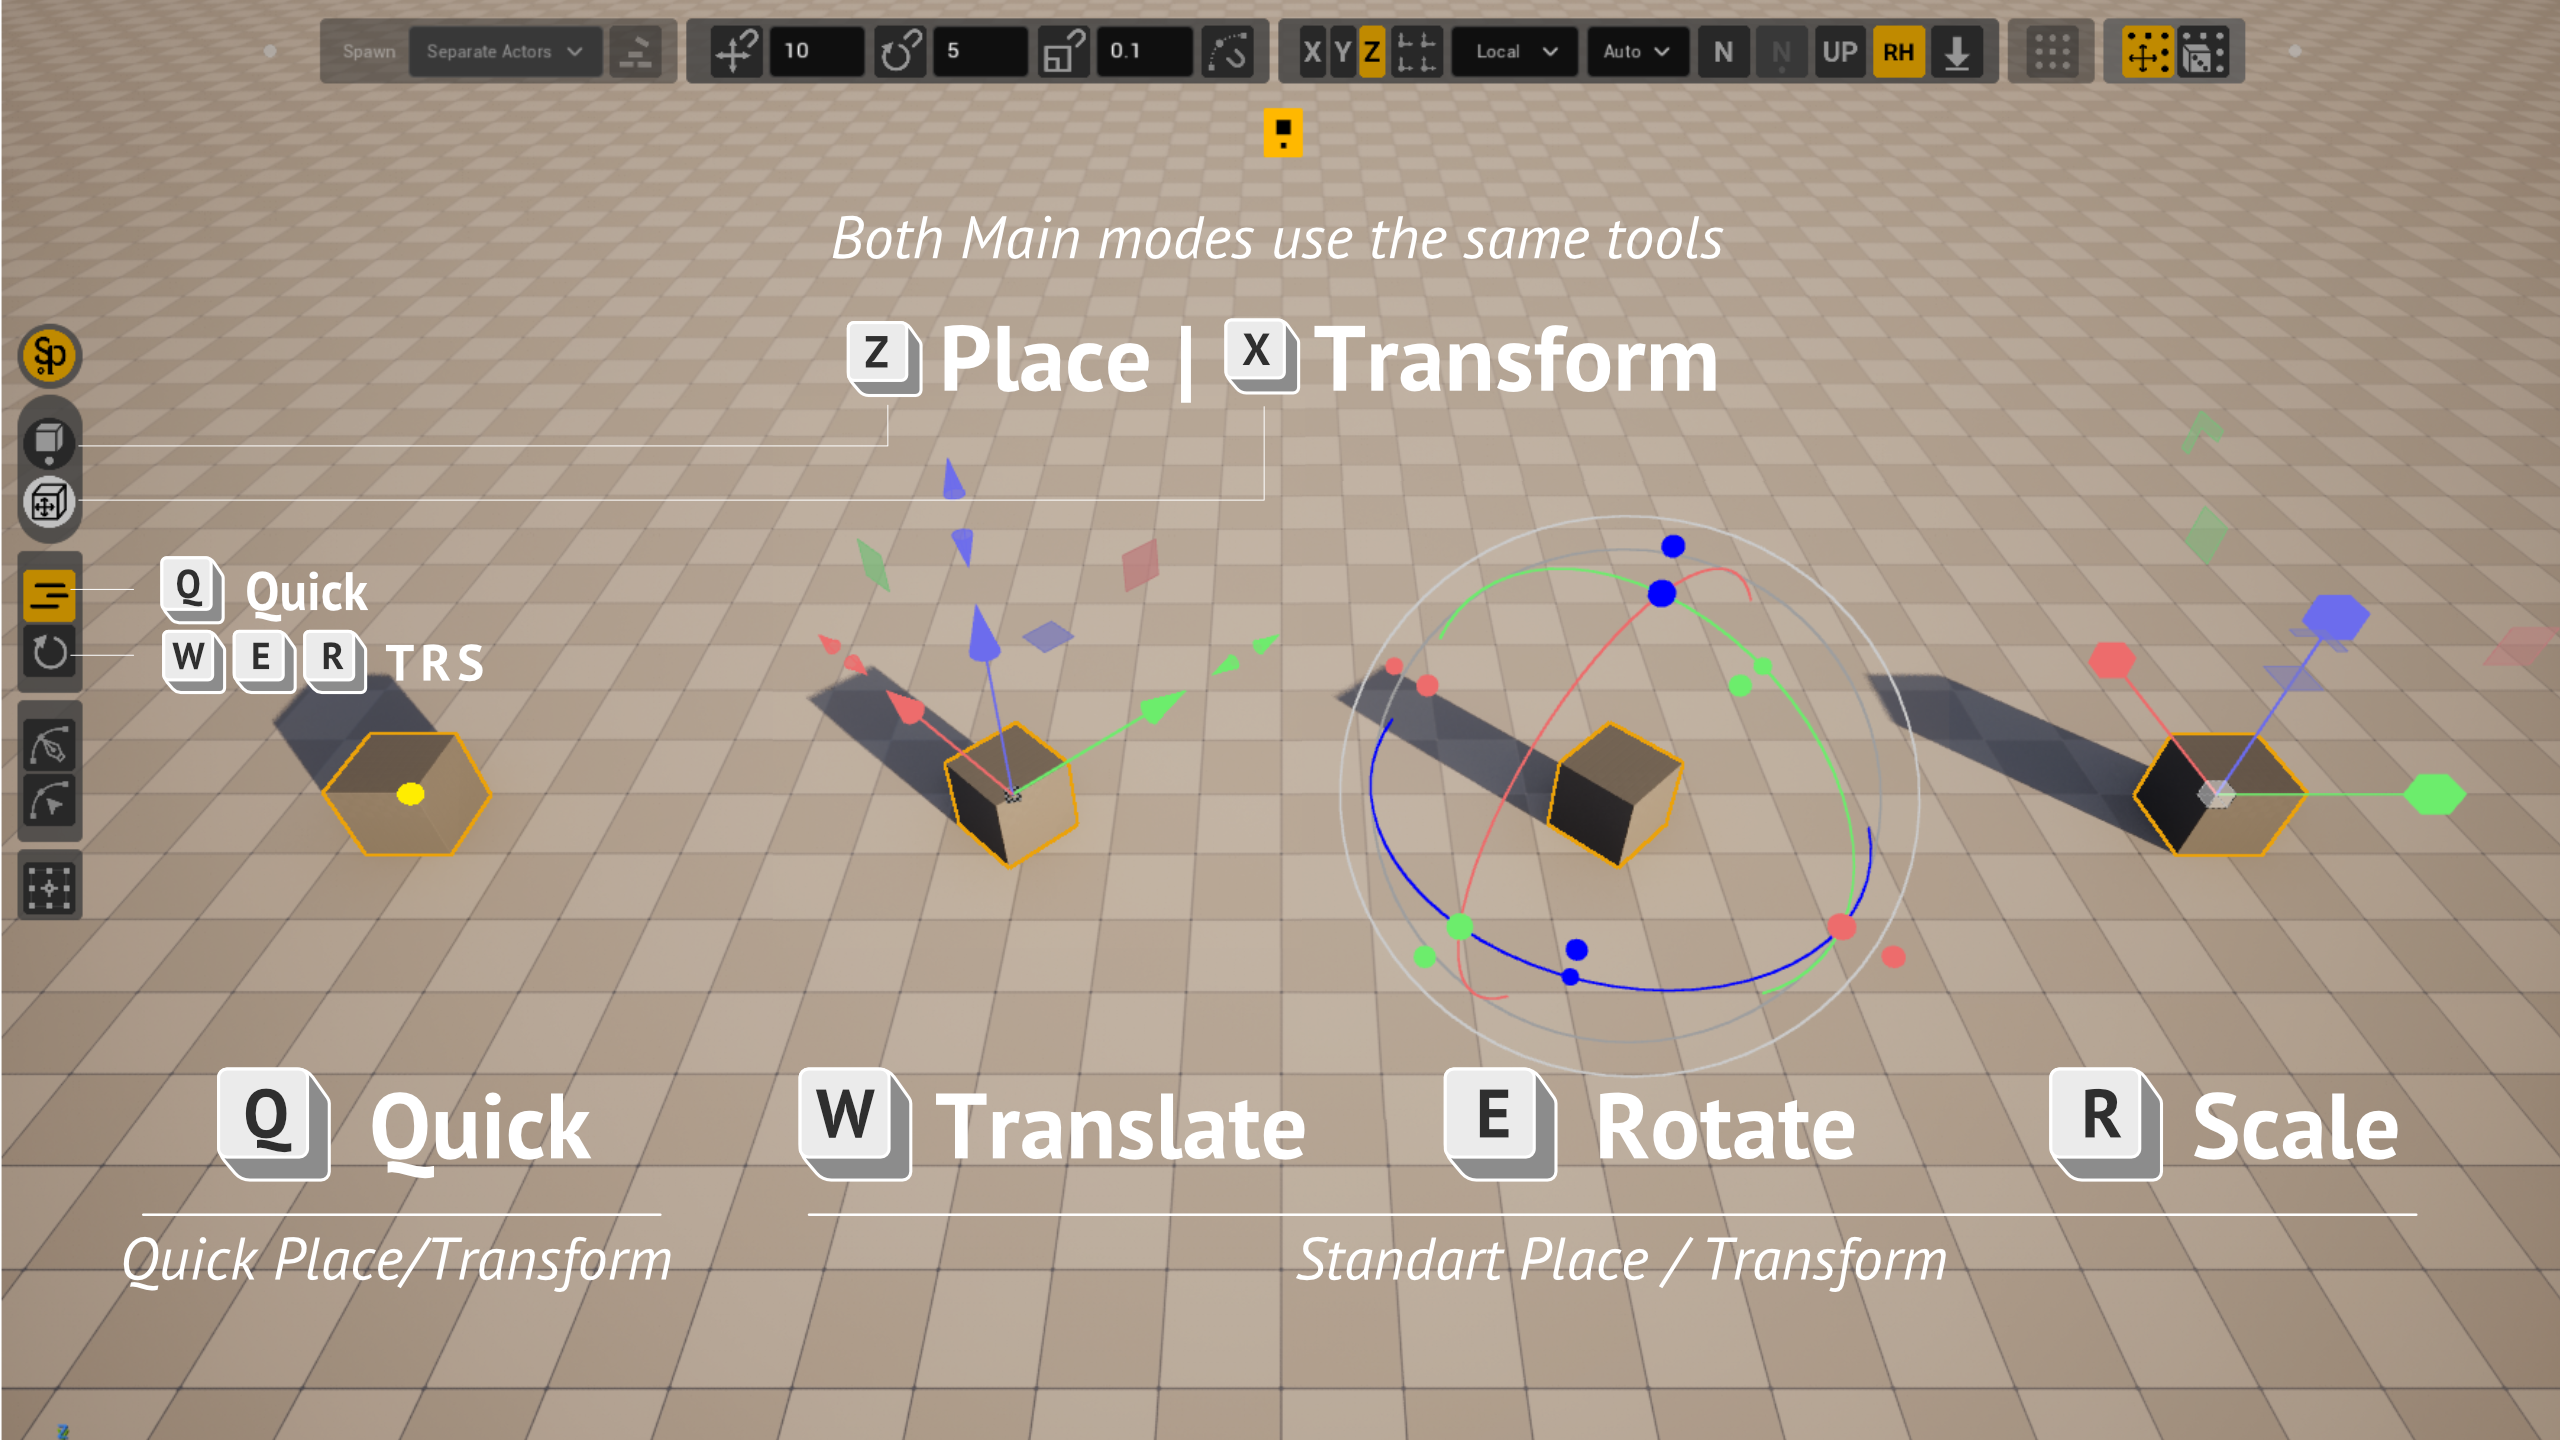
Three familiar-but-advanced gizmos, plus one new tool: Quick Place/Transform. Full documentation for Quick will come later, but in short: while it's active the actor always follows the cursor and is placed/moved on click. It's worth watching the video above.
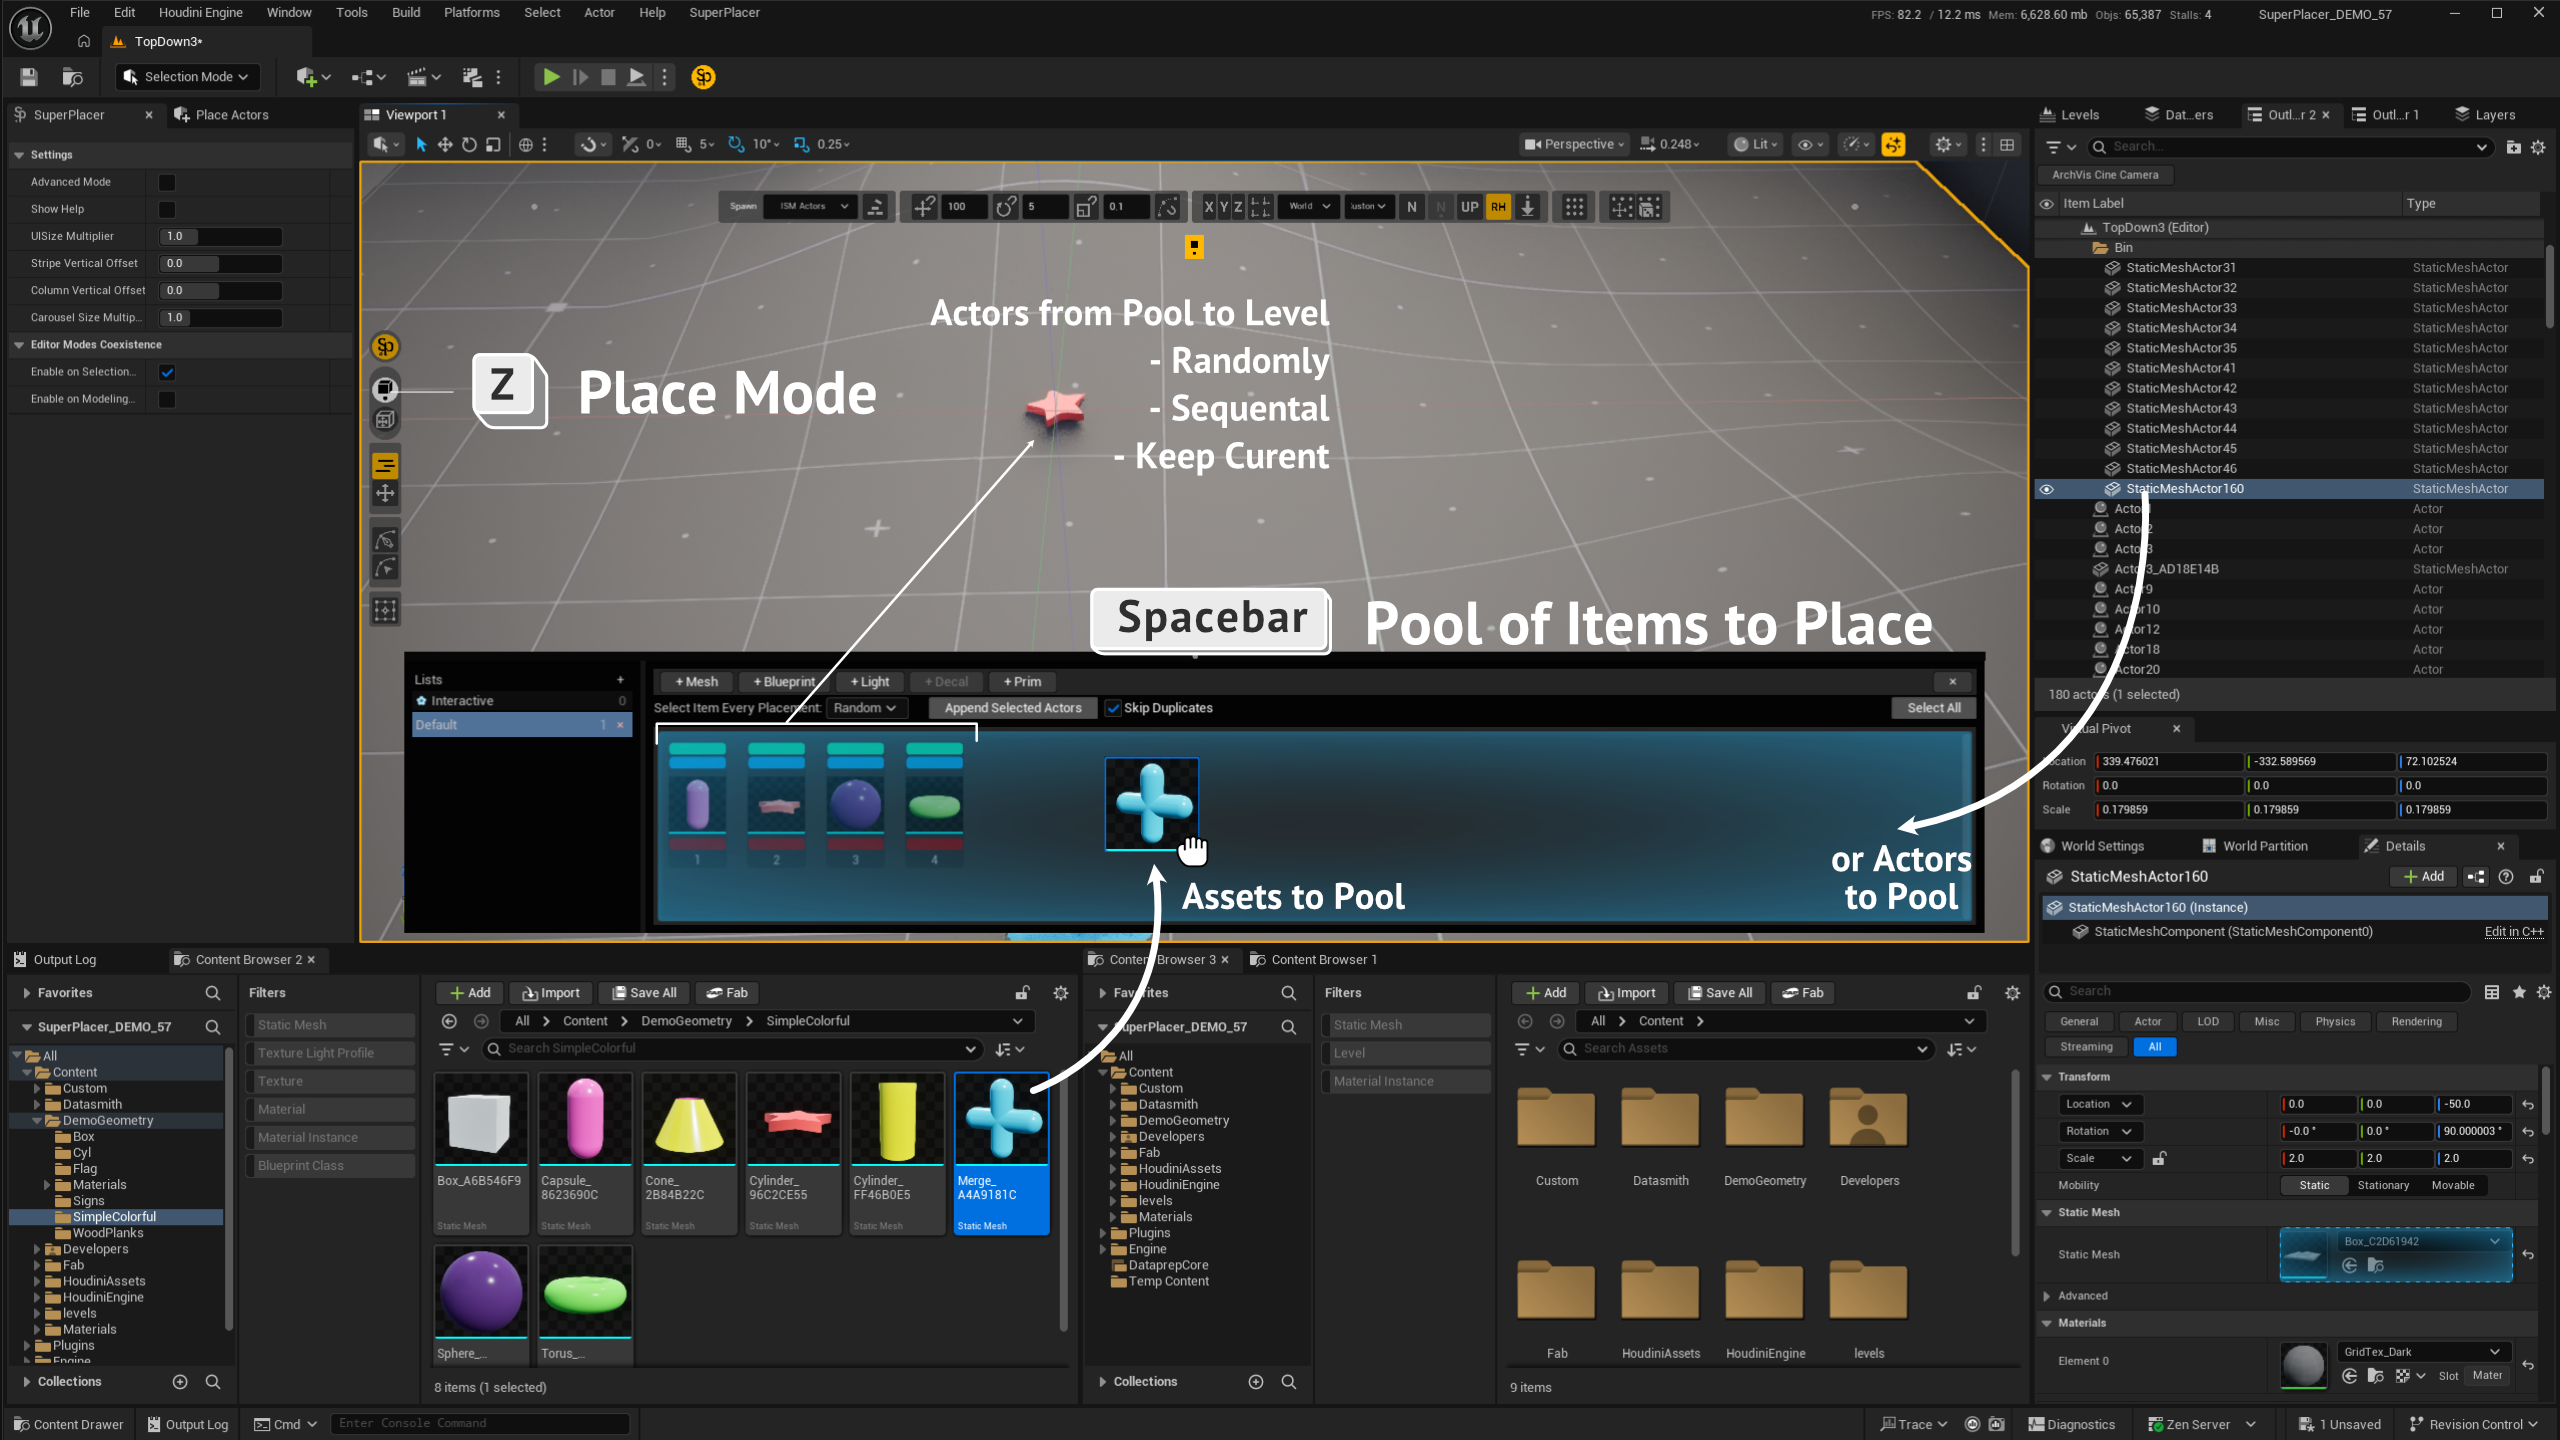
Before placing actors you need to put them into a special pool, which you open by pressing Space. You can drop assets into the pool from the Content Browser via drag & drop, or from the toolbar of the pool's mini-browser. You can also add actors selected on the level into the pool if they're compatible with Place Mode, using the Append Selected Actors button or the F12 key (in that case the actors go into the Fly list).
Static meshes, blueprint actors, lights, decals and GeoGen actors (in development) are supported — the last being dynamic-mesh primitives that get baked into an individual Static Mesh on every placement. The mini-browser has settings for what happens after each asset is placed: keep the current selected asset, pick the next one, or pick a random one.
You can place assets on the level by clicking (if you're using Quick Place), with Alt+Drag, or by pressing Enter. At that moment the preview actor is finalized, the final actor spawns in its place, and the preview actor keeps showing what will be placed next time — this is exactly where the automatic "next asset" logic kicks in: keep current, pick next, pick random.
Even though it's recommended to put actors into the pool first before placing them comfortably with SuperPlacer, you can just drag assets from the Content Browser into the viewport the normal way and continue placing them in Transform Mode (X).
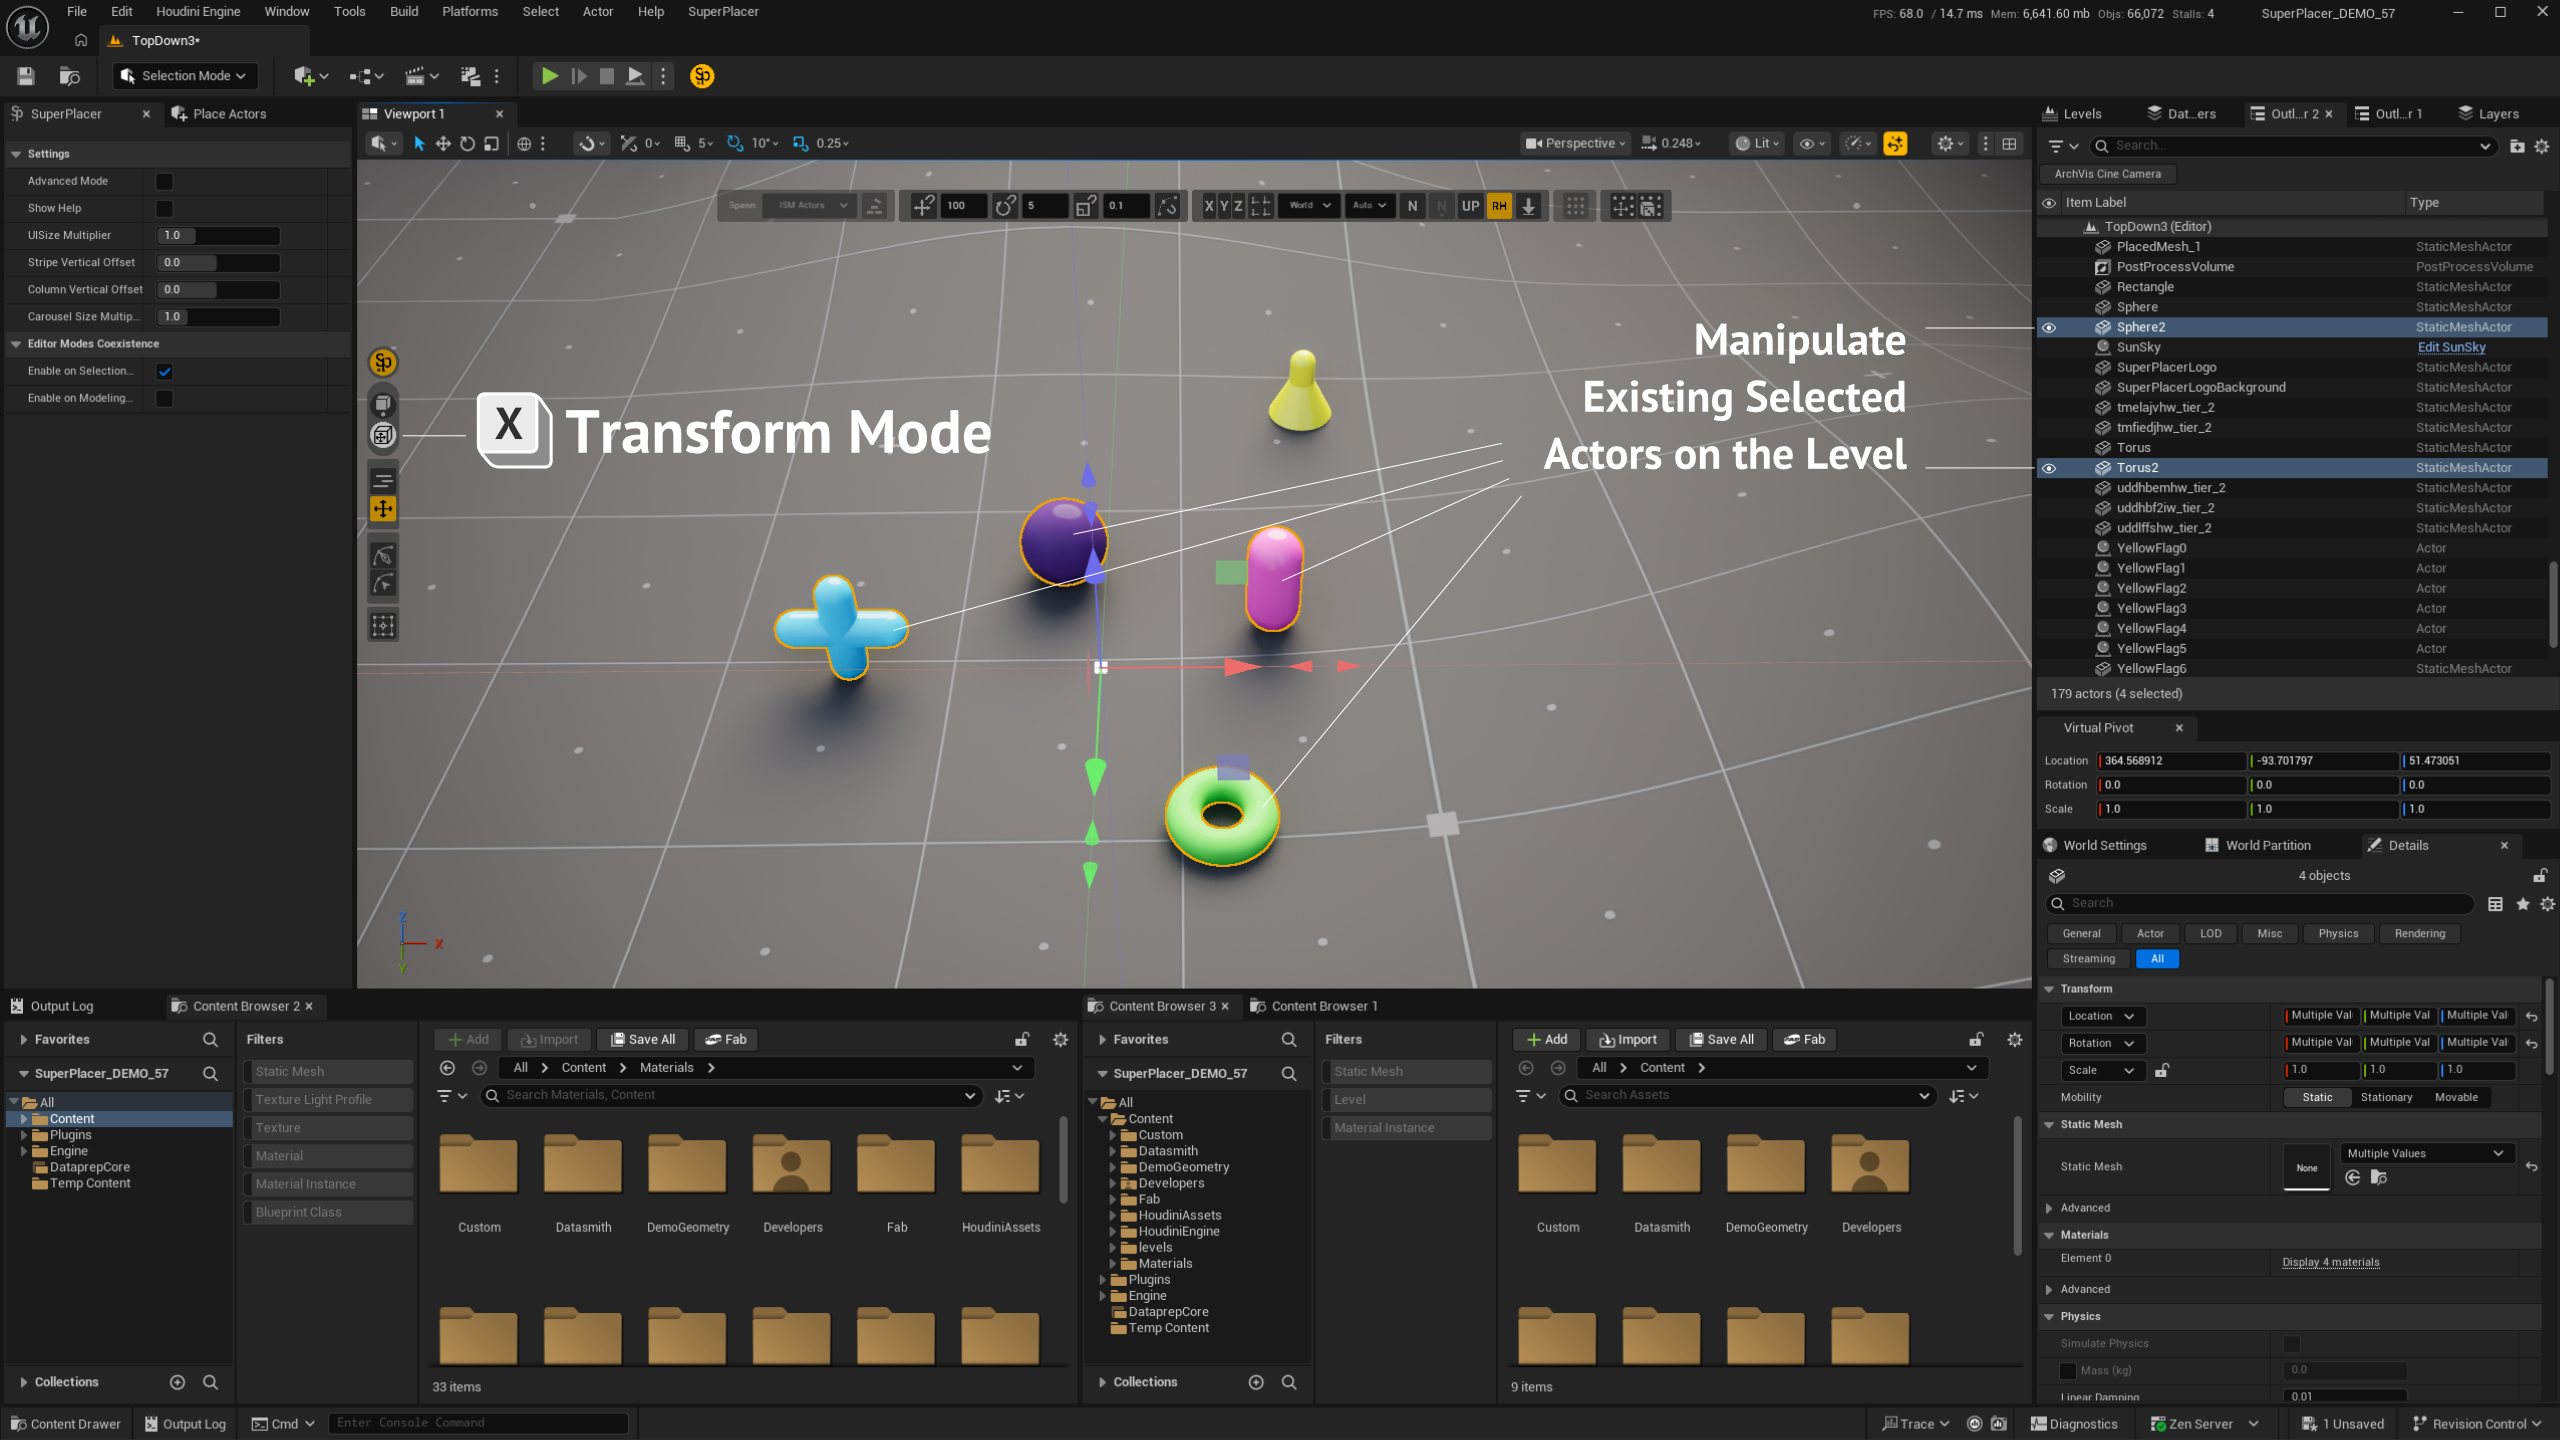
This is SuperPlacer's main mode. It works alongside Unreal Engine's standard Selection Mode and uses advanced tools to manipulate actors on the level.
02 | Advanced Gizmo
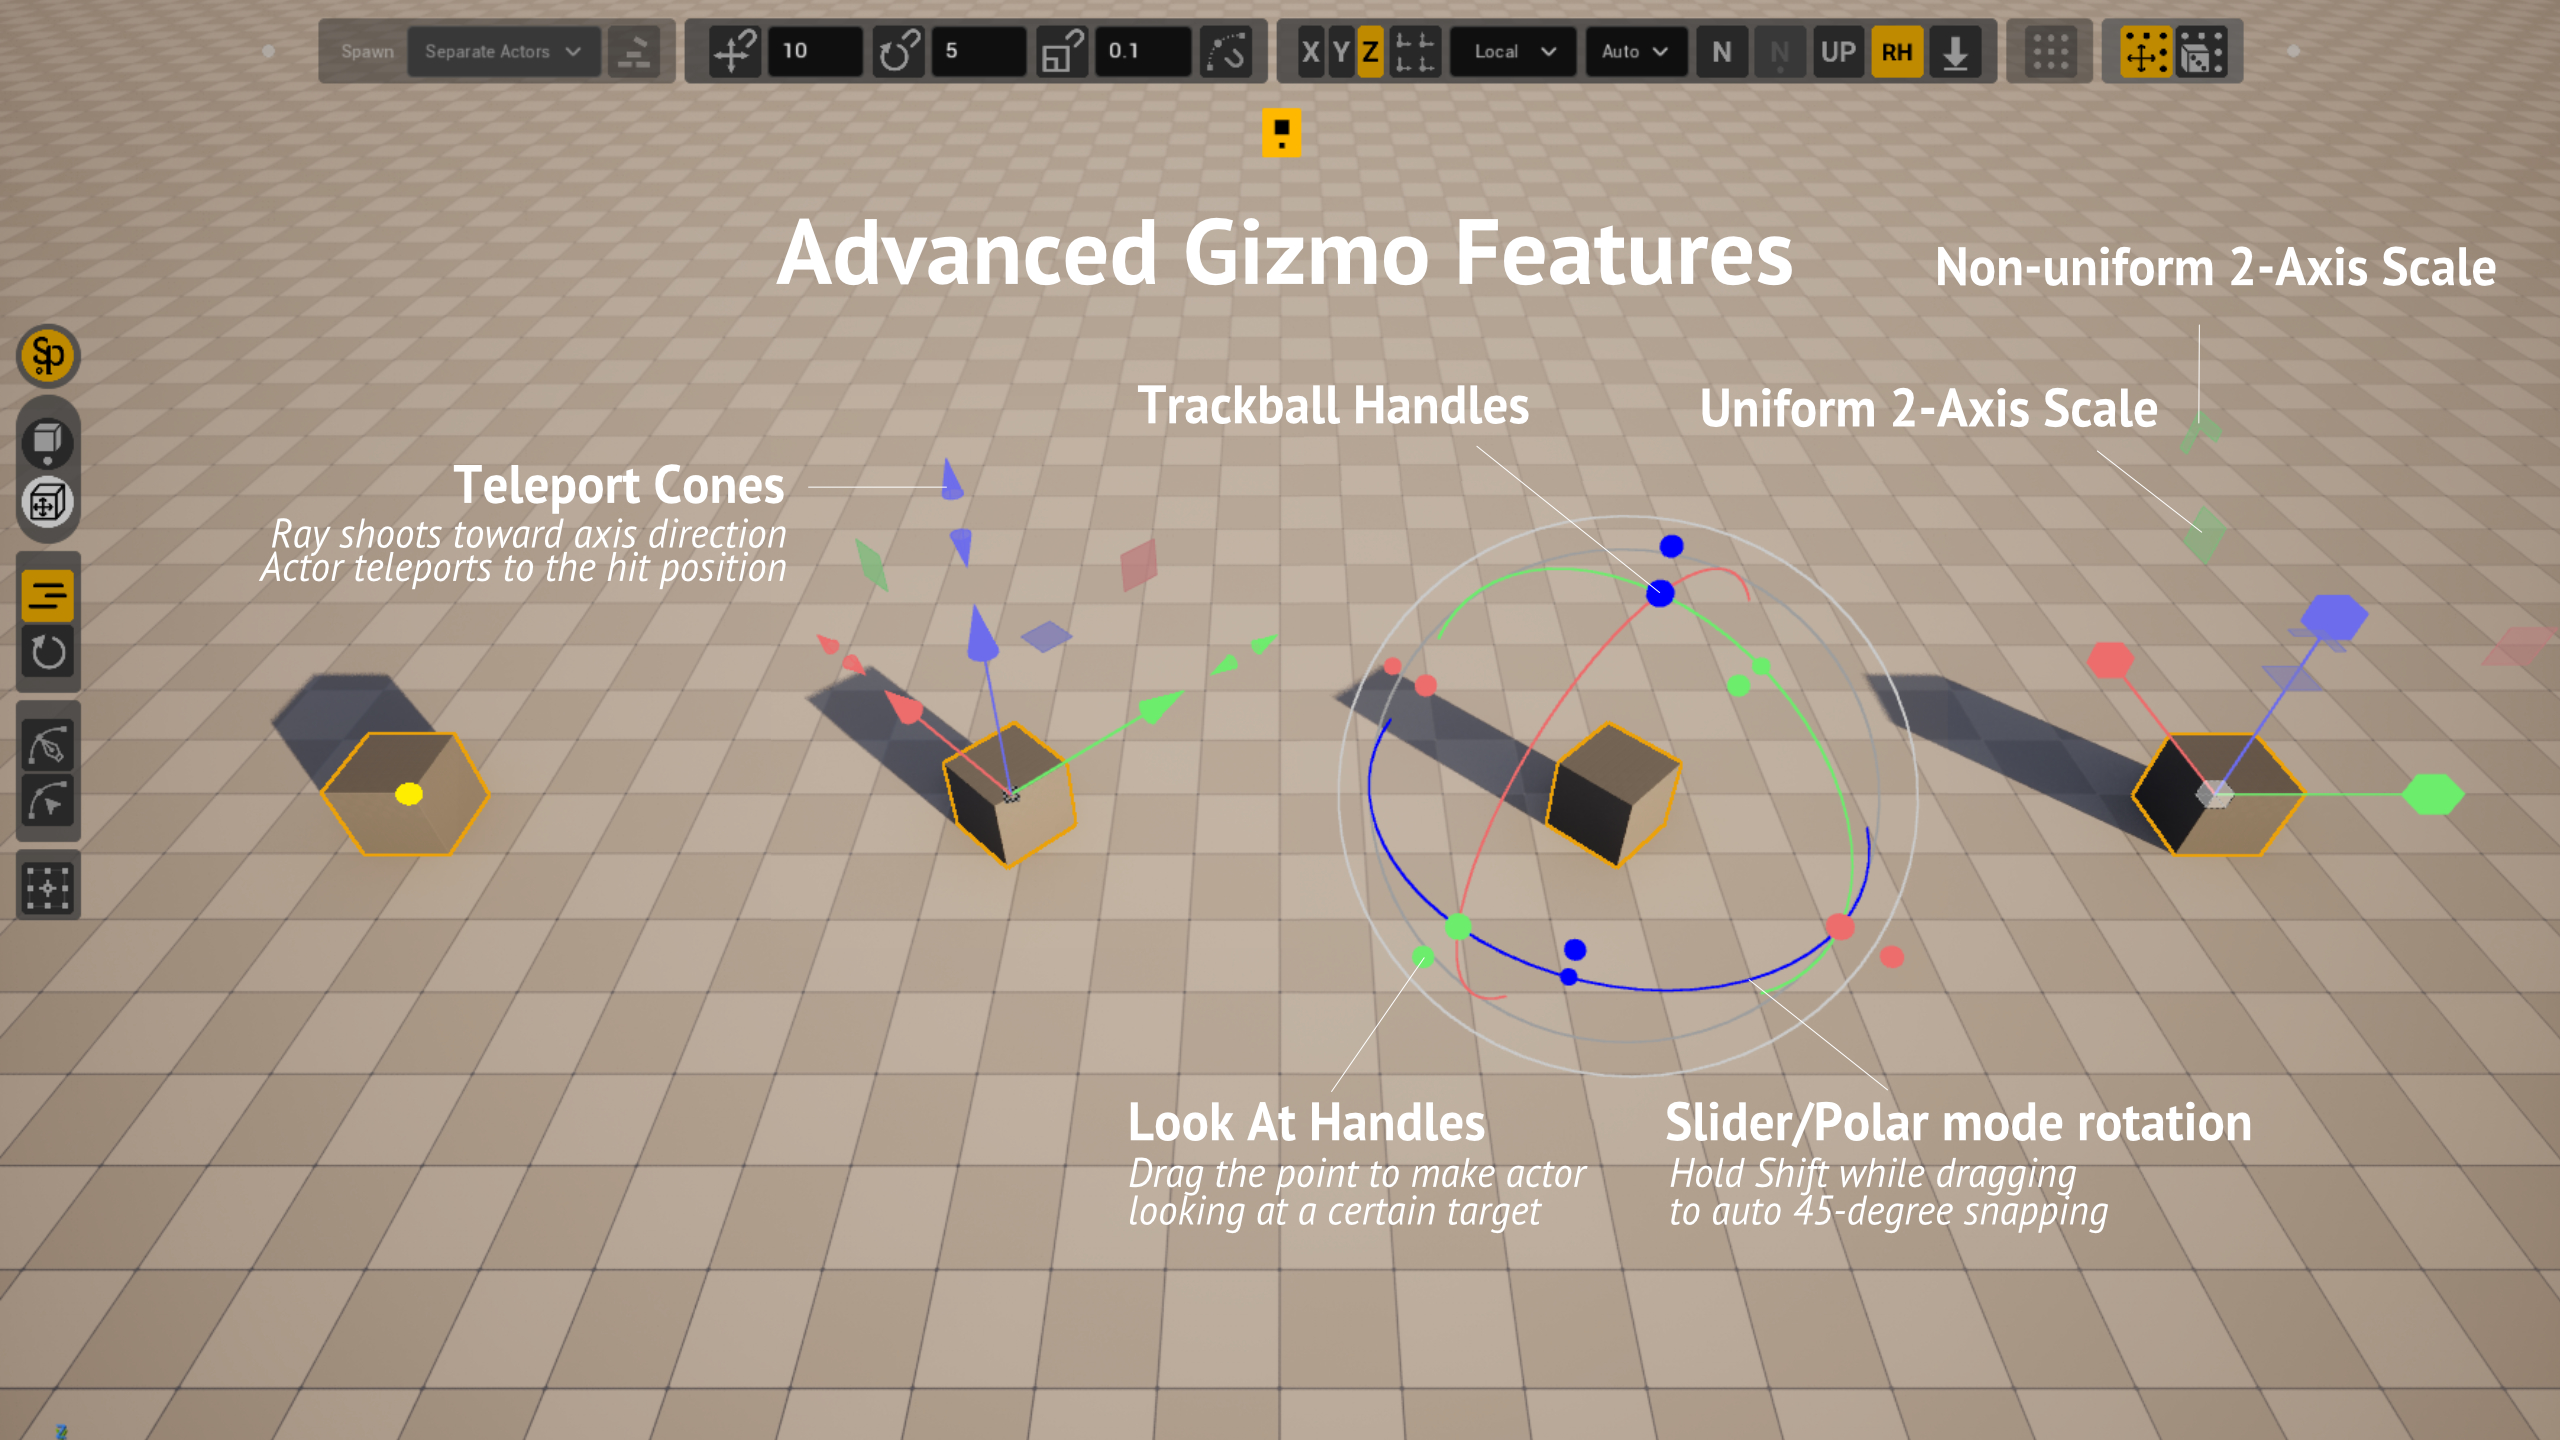
SuperPlacer uses its own gizmos (in development), compatible with SuperPlacer's unified transform core. The gizmos are being built to transform most things that can have their position, rotation and scale changed in the same way — whether that's actors, spline points, or instances. We recommend watching the Getting Started video at the top of this page to get a feel for how SuperPlacer's gizmos work. In SuperPlacer the gizmo moves the virtual pivot, and the selected actors move as children of that virtual pivot.
03 | AHDI
AHDI is another one of your best friends — you'll be using it all the time. It's a system that tracks certain actions, like moving the virtual pivot (and the selected actors along with it). As soon as an action is tracked — say you've just moved an actor along the X axis, or even just clicked a gizmo axis — you immediately get the chance to type a number on the keyboard to assign an exact position to the actor on that axis.
If you bring up the AHDI box with a math key — / * - + — a math operation is applied on top of the current value on the X axis. For example, an actor sits at X = 150, Y = 10, Z = 1000; we touch the X axis on the gizmo and start typing "+" on the keyboard. The AHDI box opens and we see, in the X field, 150 + "and here we just type the number we need, say 50". The actor instantly moves to X = 200. Press Enter to confirm, Esc to cancel, Alt+Enter to confirm and copy the actor into the new position.
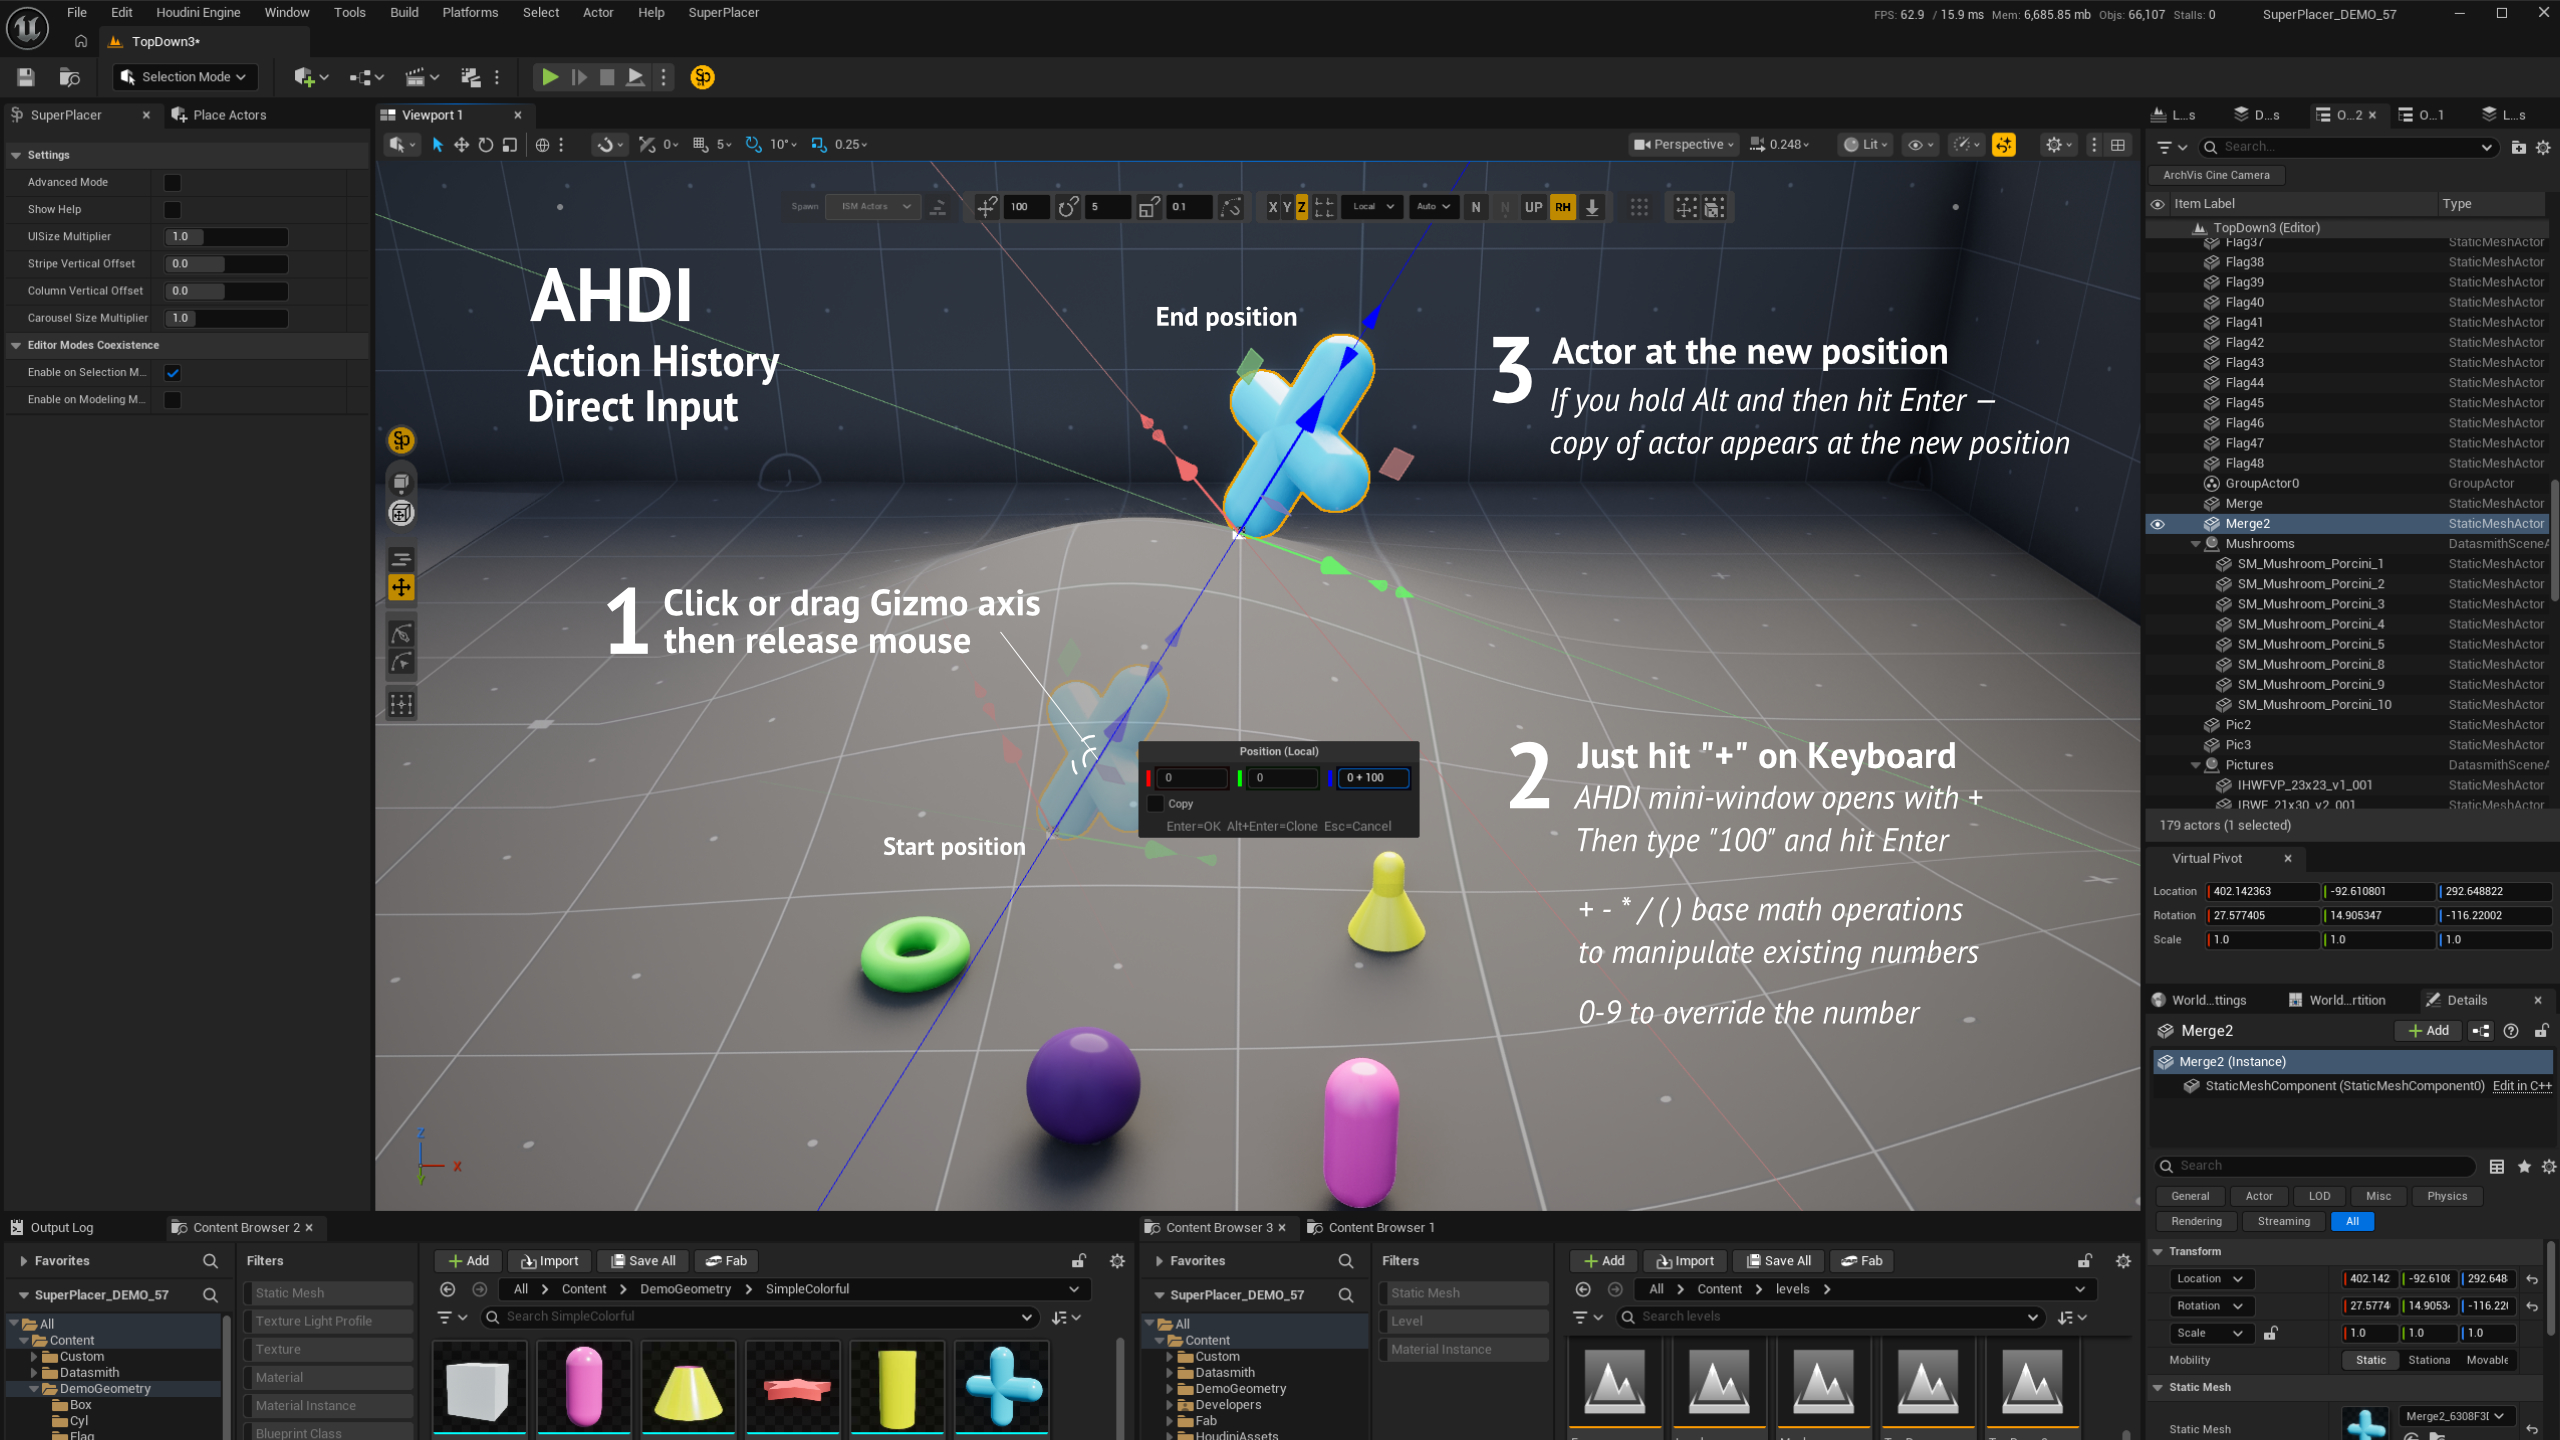
04 | Virtual Pivot (C)
A temporary pivot point that's only used during the placement stage and has no effect on the finalized actor on the level. It's the parent for the preview actor in Place Mode and for the selected actors in Transform Mode.
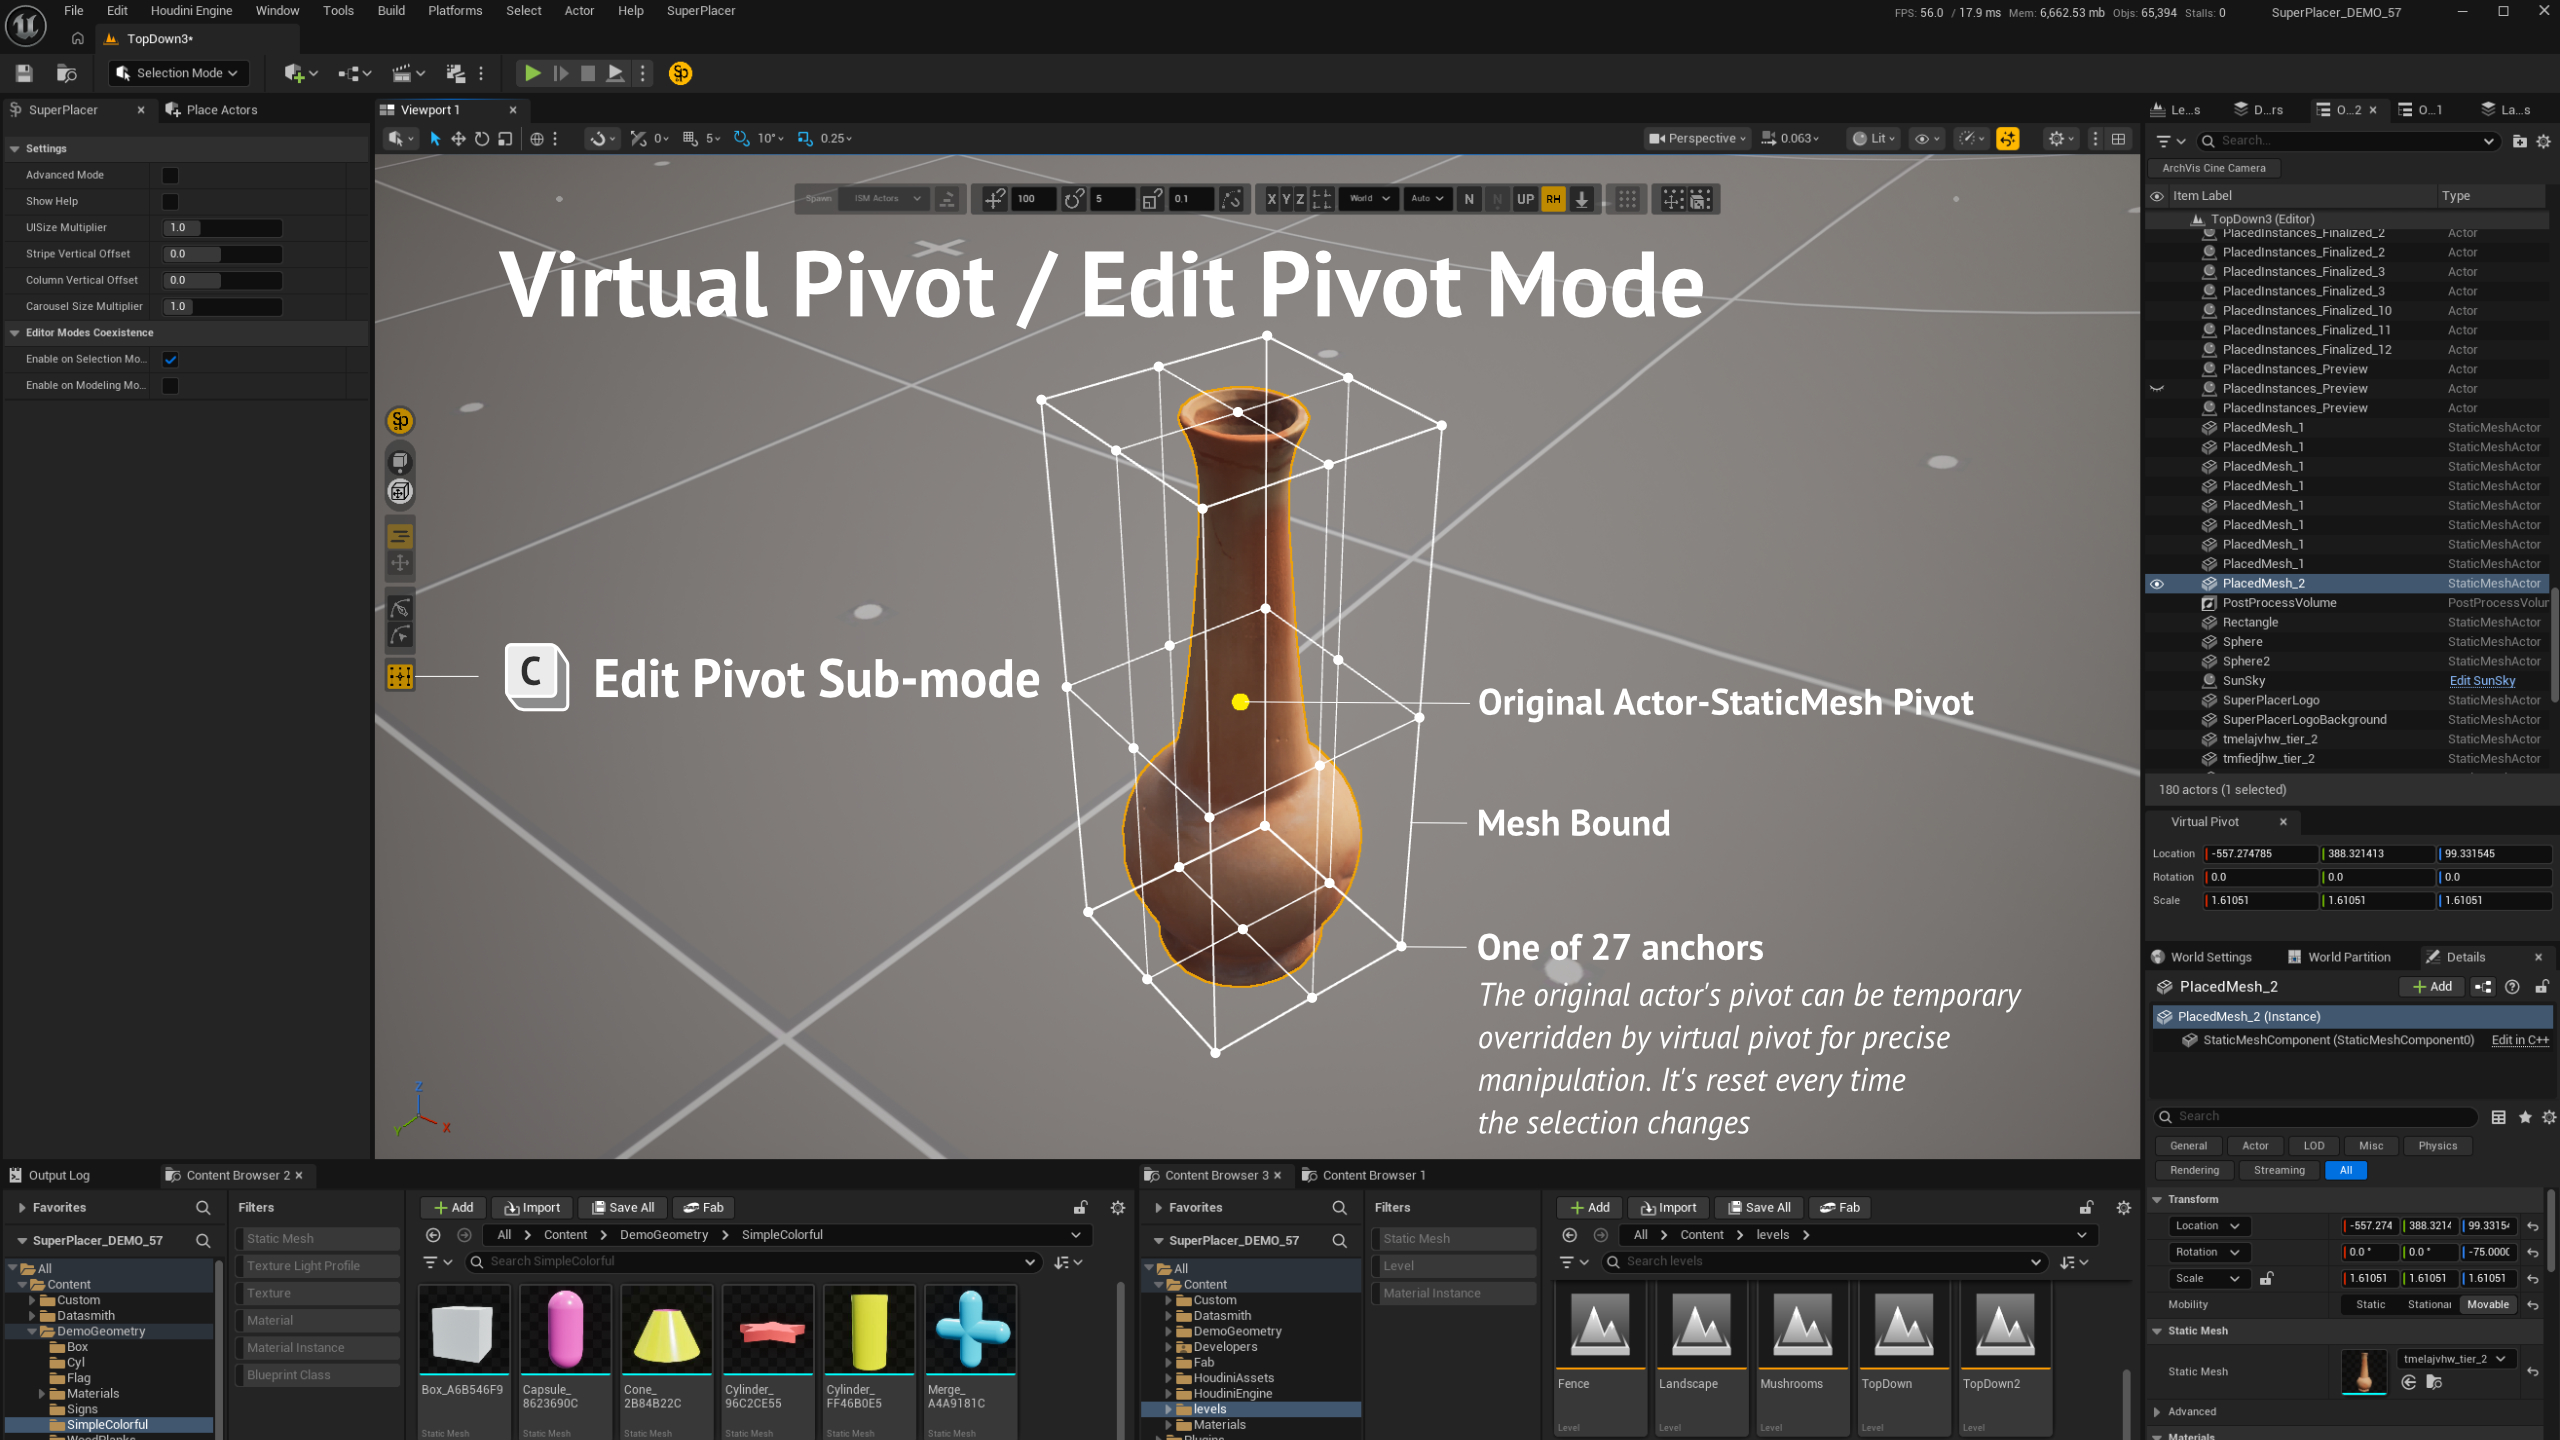
You open the mode with the C hotkey, where you can pick a new position for the pivot based on the bounds, or just move the pivot with the gizmo. You can also bring up the 'I' helper to eyedrop a position for the virtual pivot from another actor. Press C to exit Edit Pivot Mode and place actors relative to the new pivot. This is shown clearly in the Virtual Pivot video at the top of this page.
05 | Patterns
Patterns in SuperPlacer are meant for quickly multiplying the number of actors you want to place. Behind that dry description is a simple thing: while working on a level an artist runs into the same situation countless times — they need something very simple, just to multiply a set of assets along a line, a grid, a circle, or along a spline. Usually, if there aren't too many actors — up to a hundred — the artist does it by hand, or reaches for heavier procedural tools that need special handling. SuperPlacer gives you that option almost instantly, and it's always right there at hand. Patterns have their own parameters panel (under active development) where you can dial in the look you want.
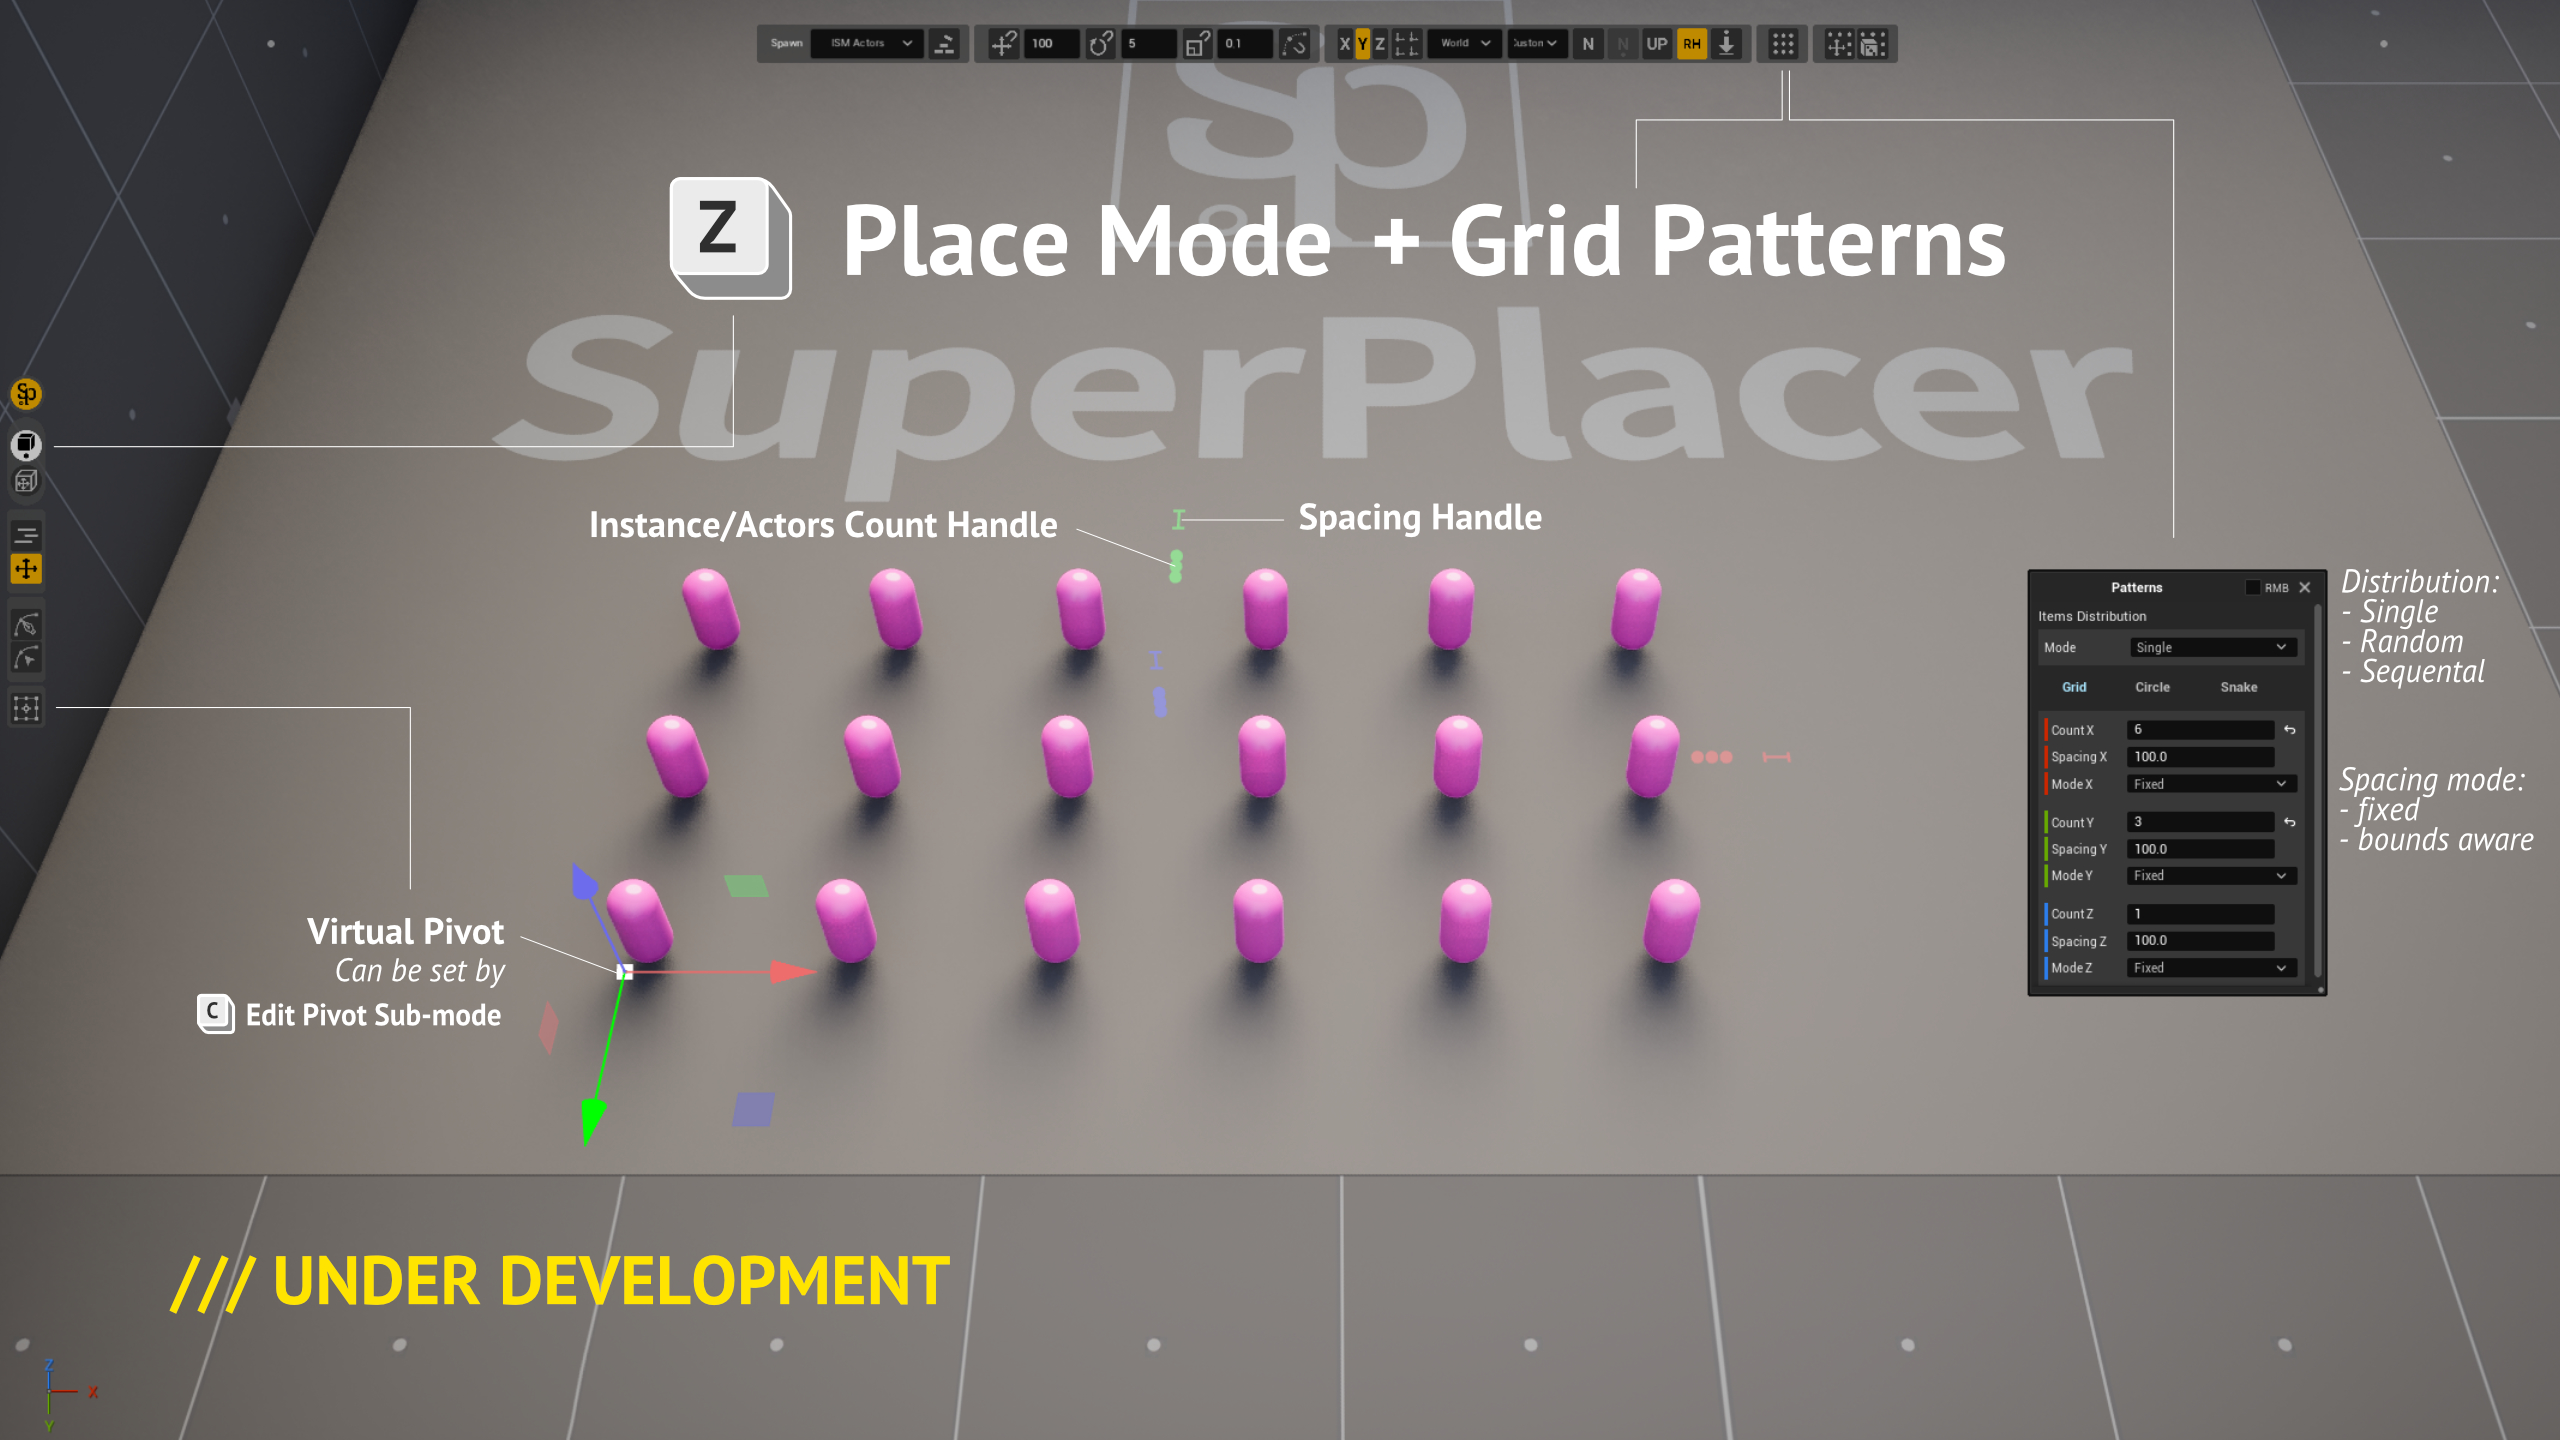
In Place Mode, while using the gizmo, you get handles — pull them and you instantly stretch the actors into a line or a grid and change the spacing between them. You can assign a random distribution of assets from the pool, or a sequential one, or just multiply a single chosen asset across the grid. You can also turn a Grid pattern into a Snake in two clicks (see the Place Mode video at the top of this page).
The Snake Pattern is that tool everyone's known for ages — distributing assets along a spline — it's just available almost instantly here. It's based on a temporary virtual spline that only lives during placement.
06 | Post-processes
Once we've set up the position and the assets, we might need to apply a post-process to the pattern — for example, apply transformations and randomizations to all the instances in the pattern. For that there's a dedicated button in the Stripe UI that brings up the Transformation & Randomization panel.
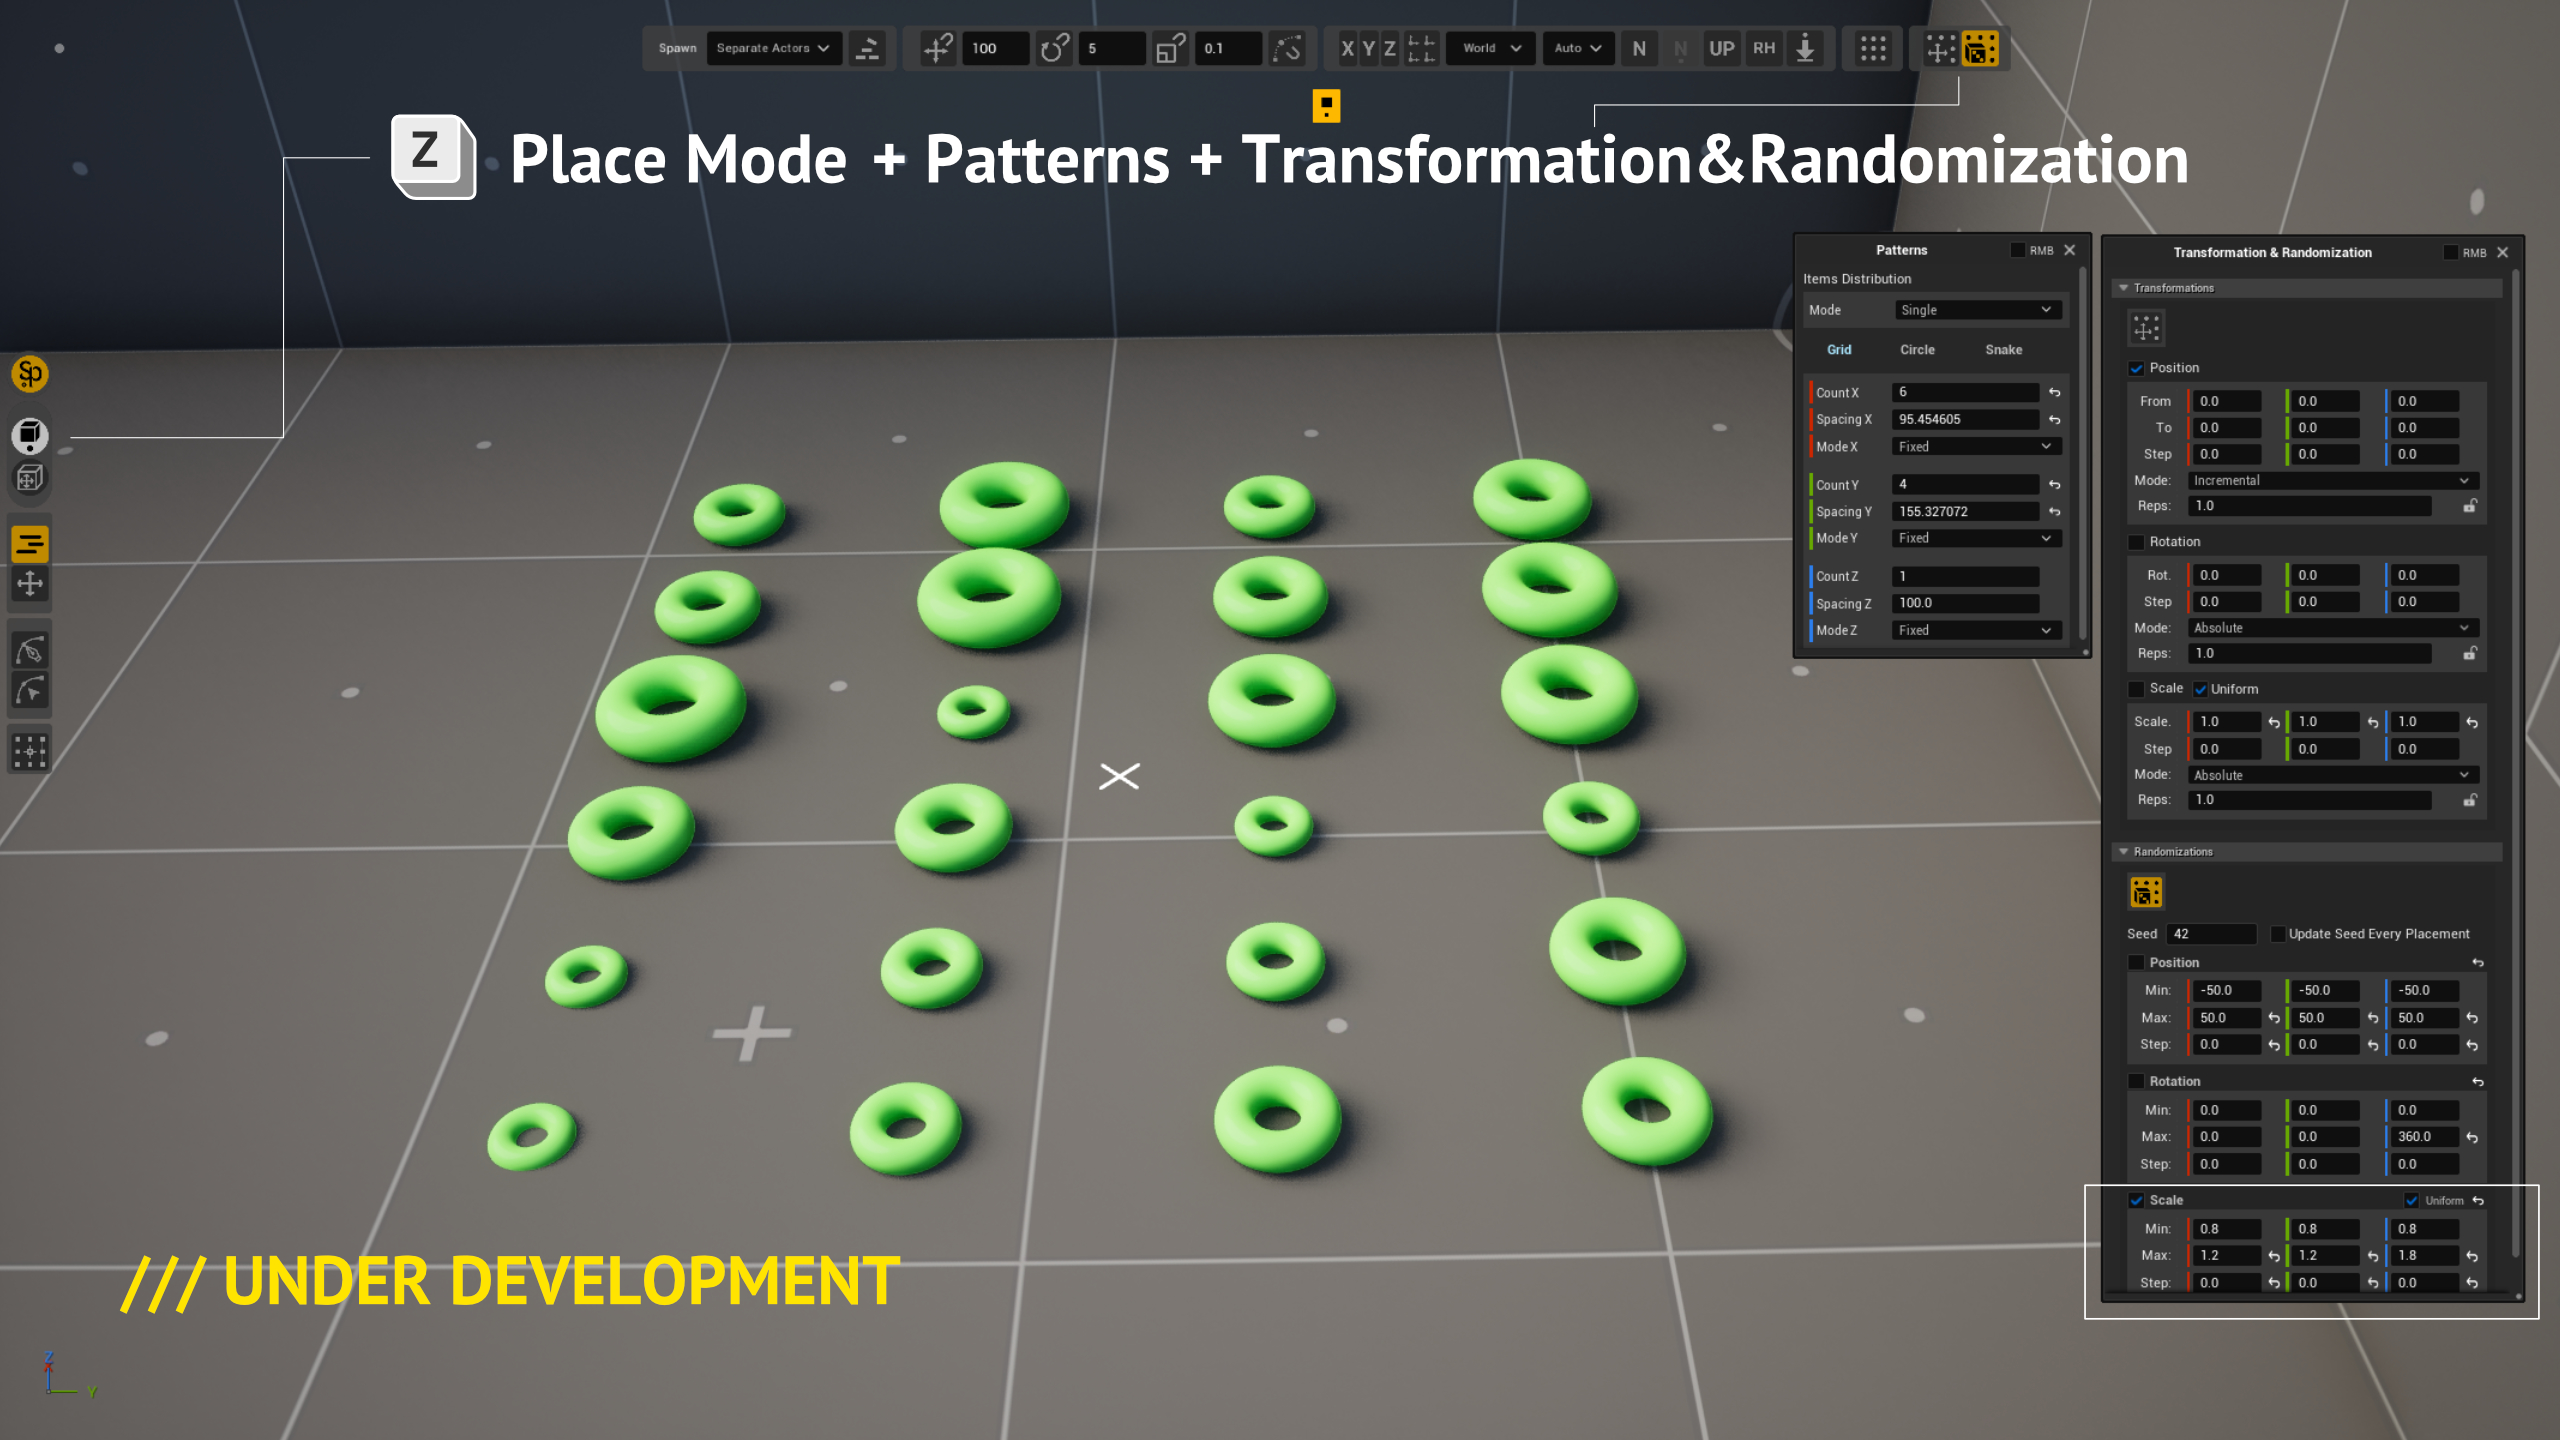
You can randomize the size of all instances, or offset all instances at once, or with a gradual falloff.
After that we can add another post-process — Directional Drop.
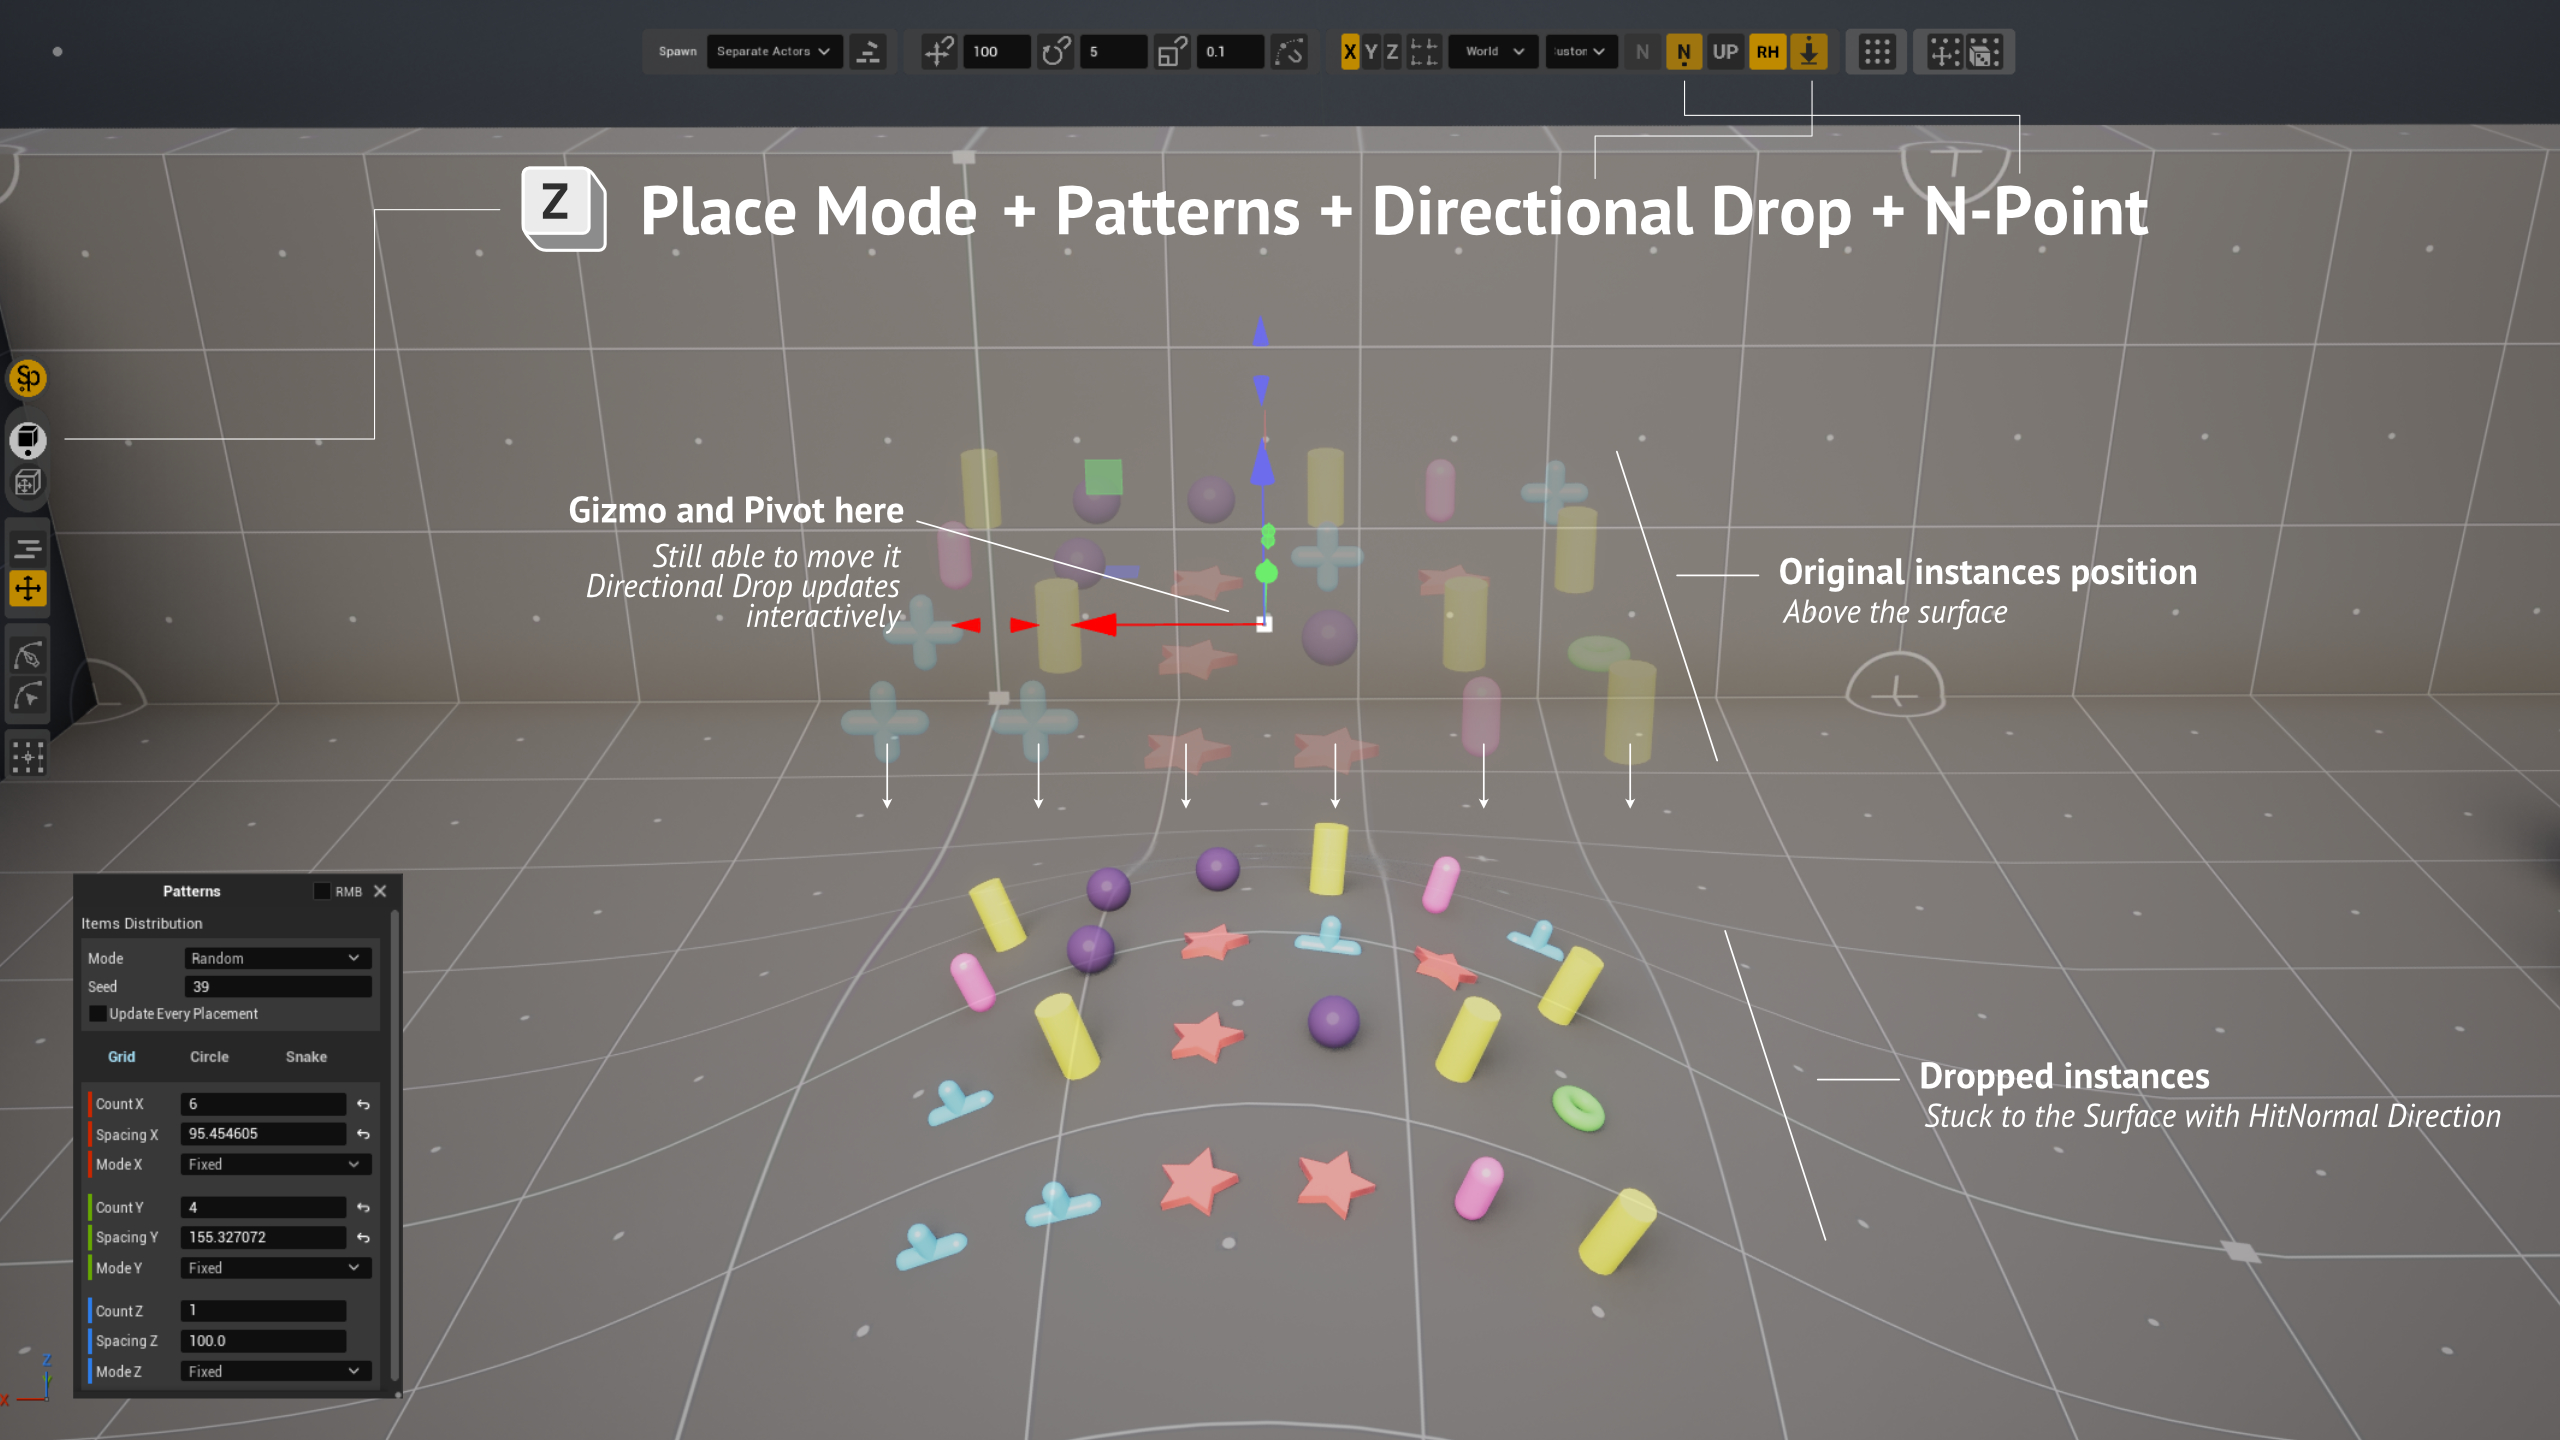
All instances move along the -Z direction of the virtual pivot until they hit an obstacle. Works in both Place and Transform mode.
Post-processes don't affect the size of the preview actor's overall bounds, so Edit Pivot Mode (C) will most likely show an out-of-date bound (this interaction is under active development).
Once we've set up the preview actor, we need to finalize it so it stays on the level.
07 | Finalization
In Place Mode, SuperPlacer has a preview actor whose look we set up using patterns and post-processes (more on those above), move around, and as soon as we're happy with the state of the actor we finalize it (Enter when working with Translate/Rotate/Scale, or just a click when using Quick Place).
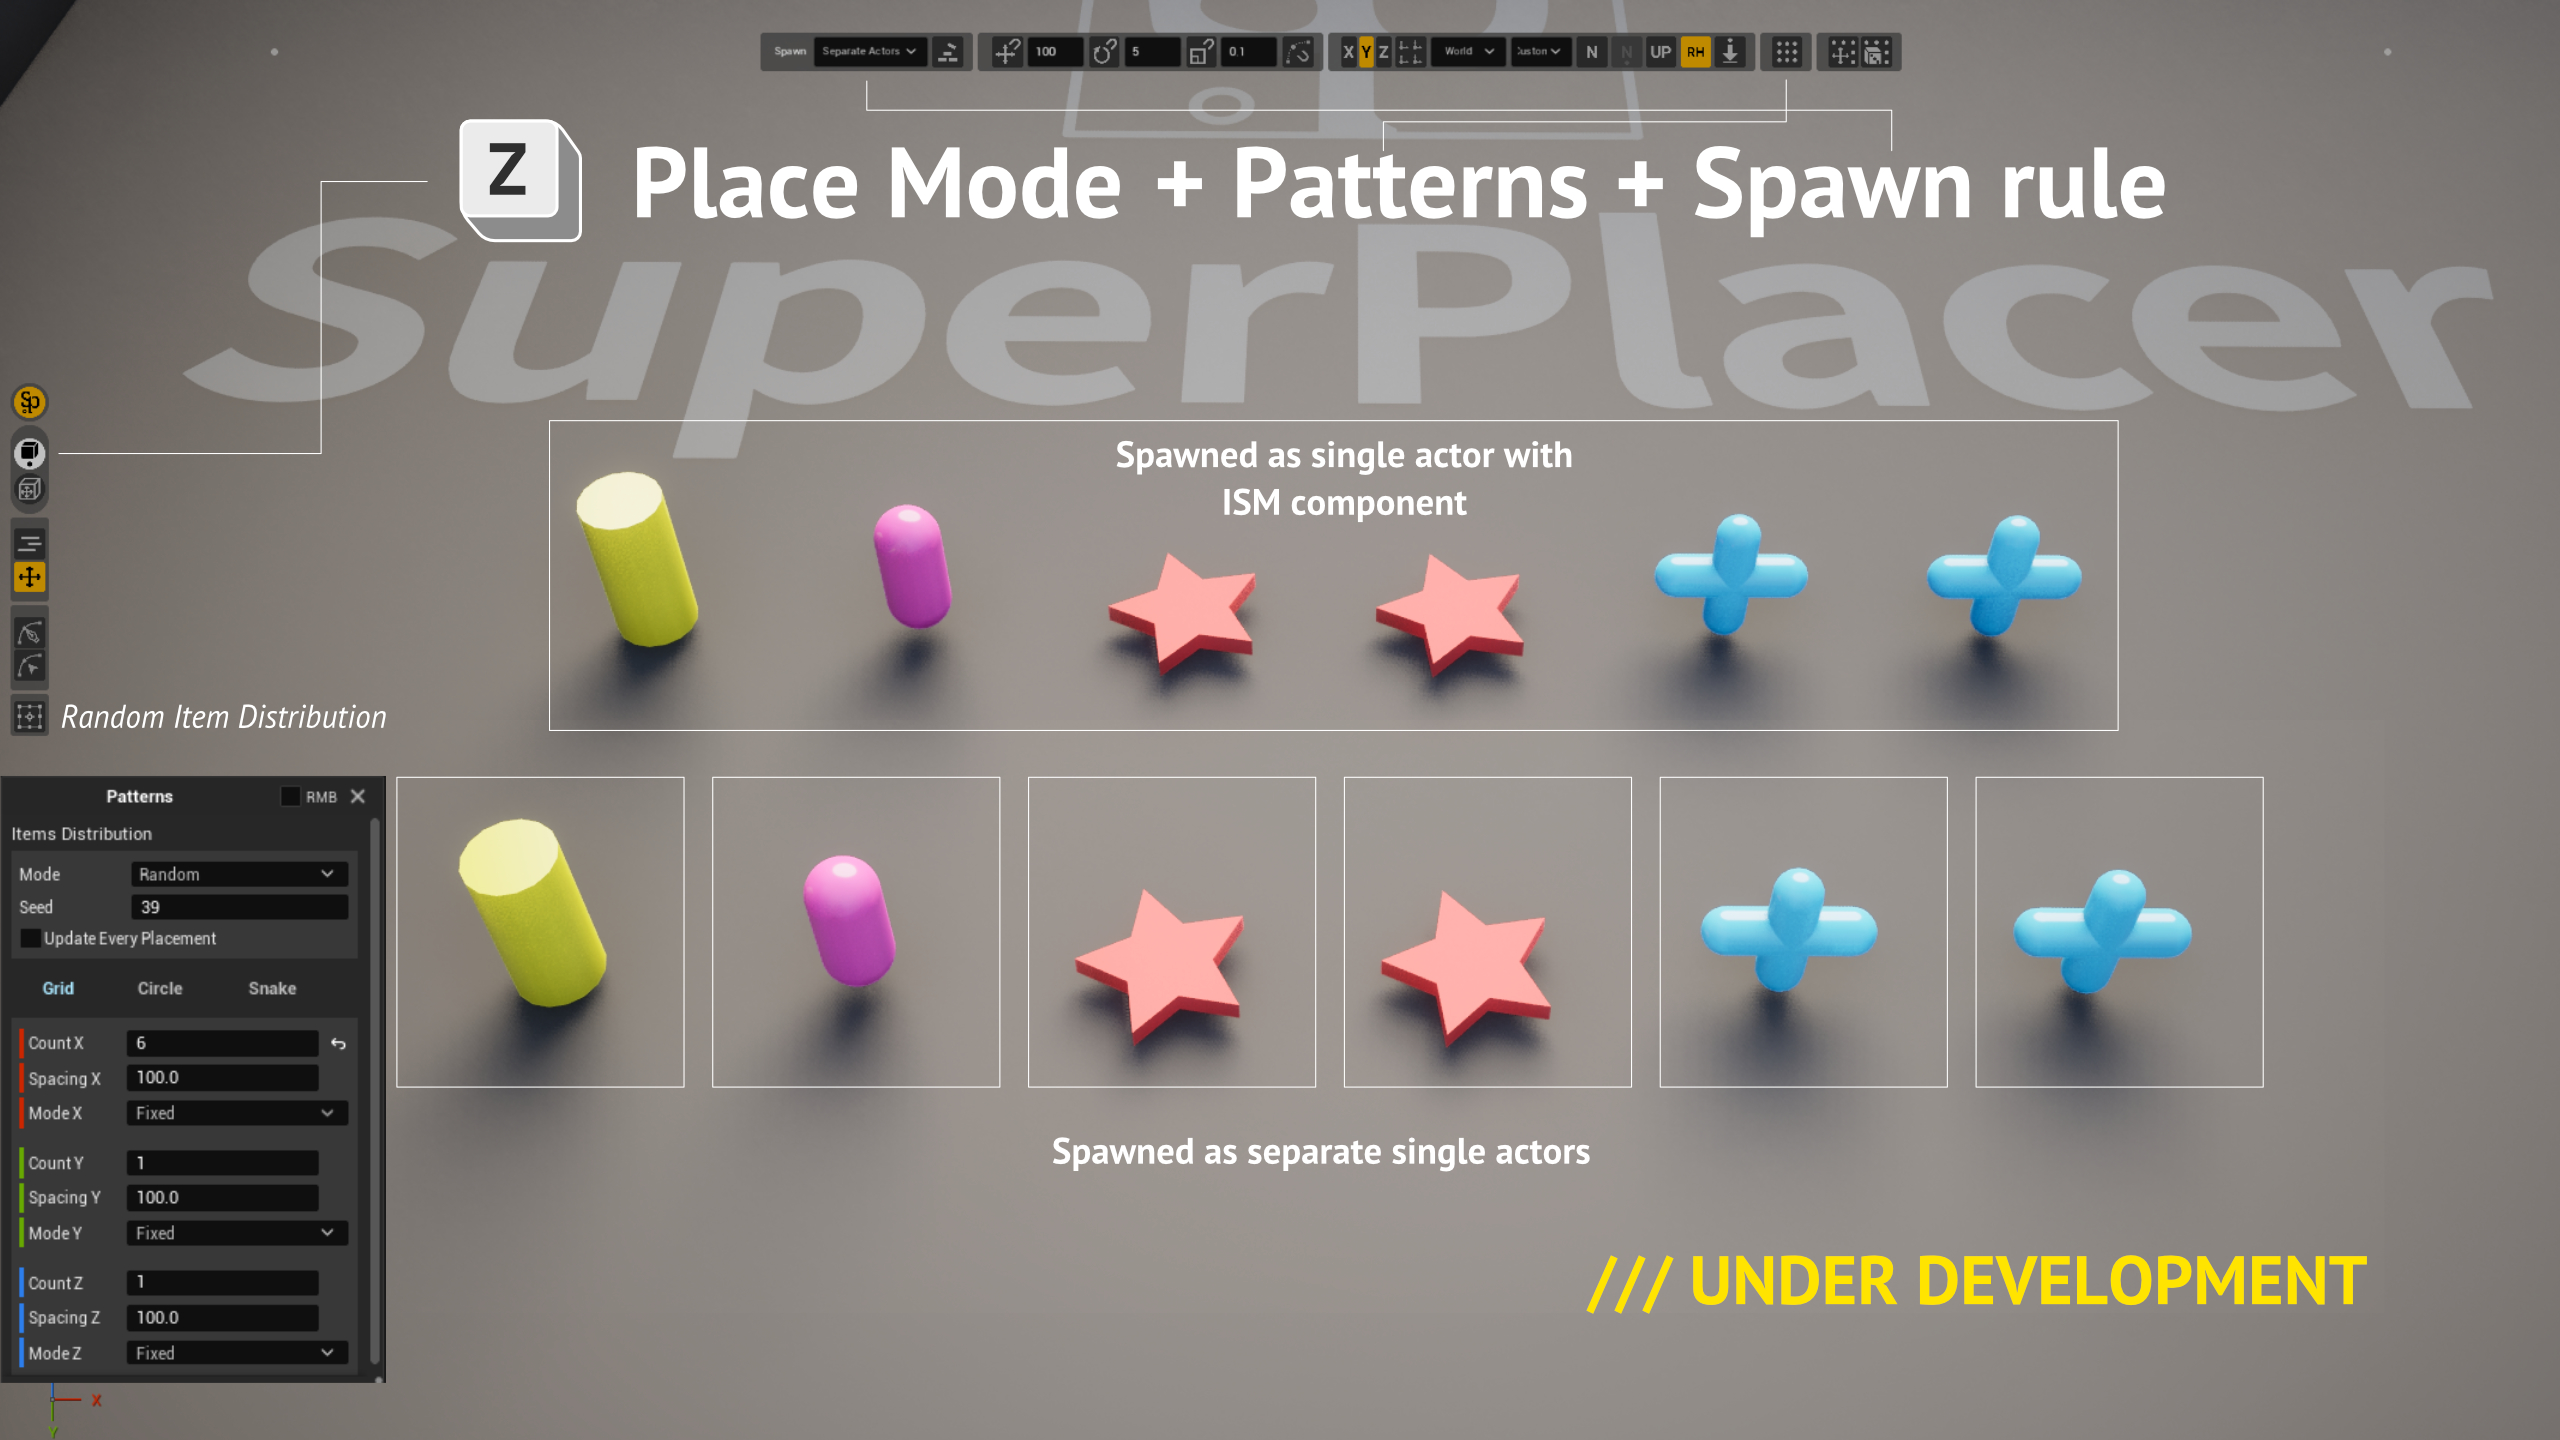
Finalization currently comes in two types:
— As ISM actors: gathers all the static meshes into a single ISM actor. Only works when we're placing Static Mesh actors only in one go.
— As separate actors: finalizes the preview actor as individual actors (Static Mesh, Blueprint Actors, Lights, Decals).
More finalization types will be added later, and it'll also be adapted to the Scene Graph in Unreal Engine 6.
08 | Advanced Transform Tools
SuperPlacer has a number of extra helpers that Unreal Engine has been missing for decades.
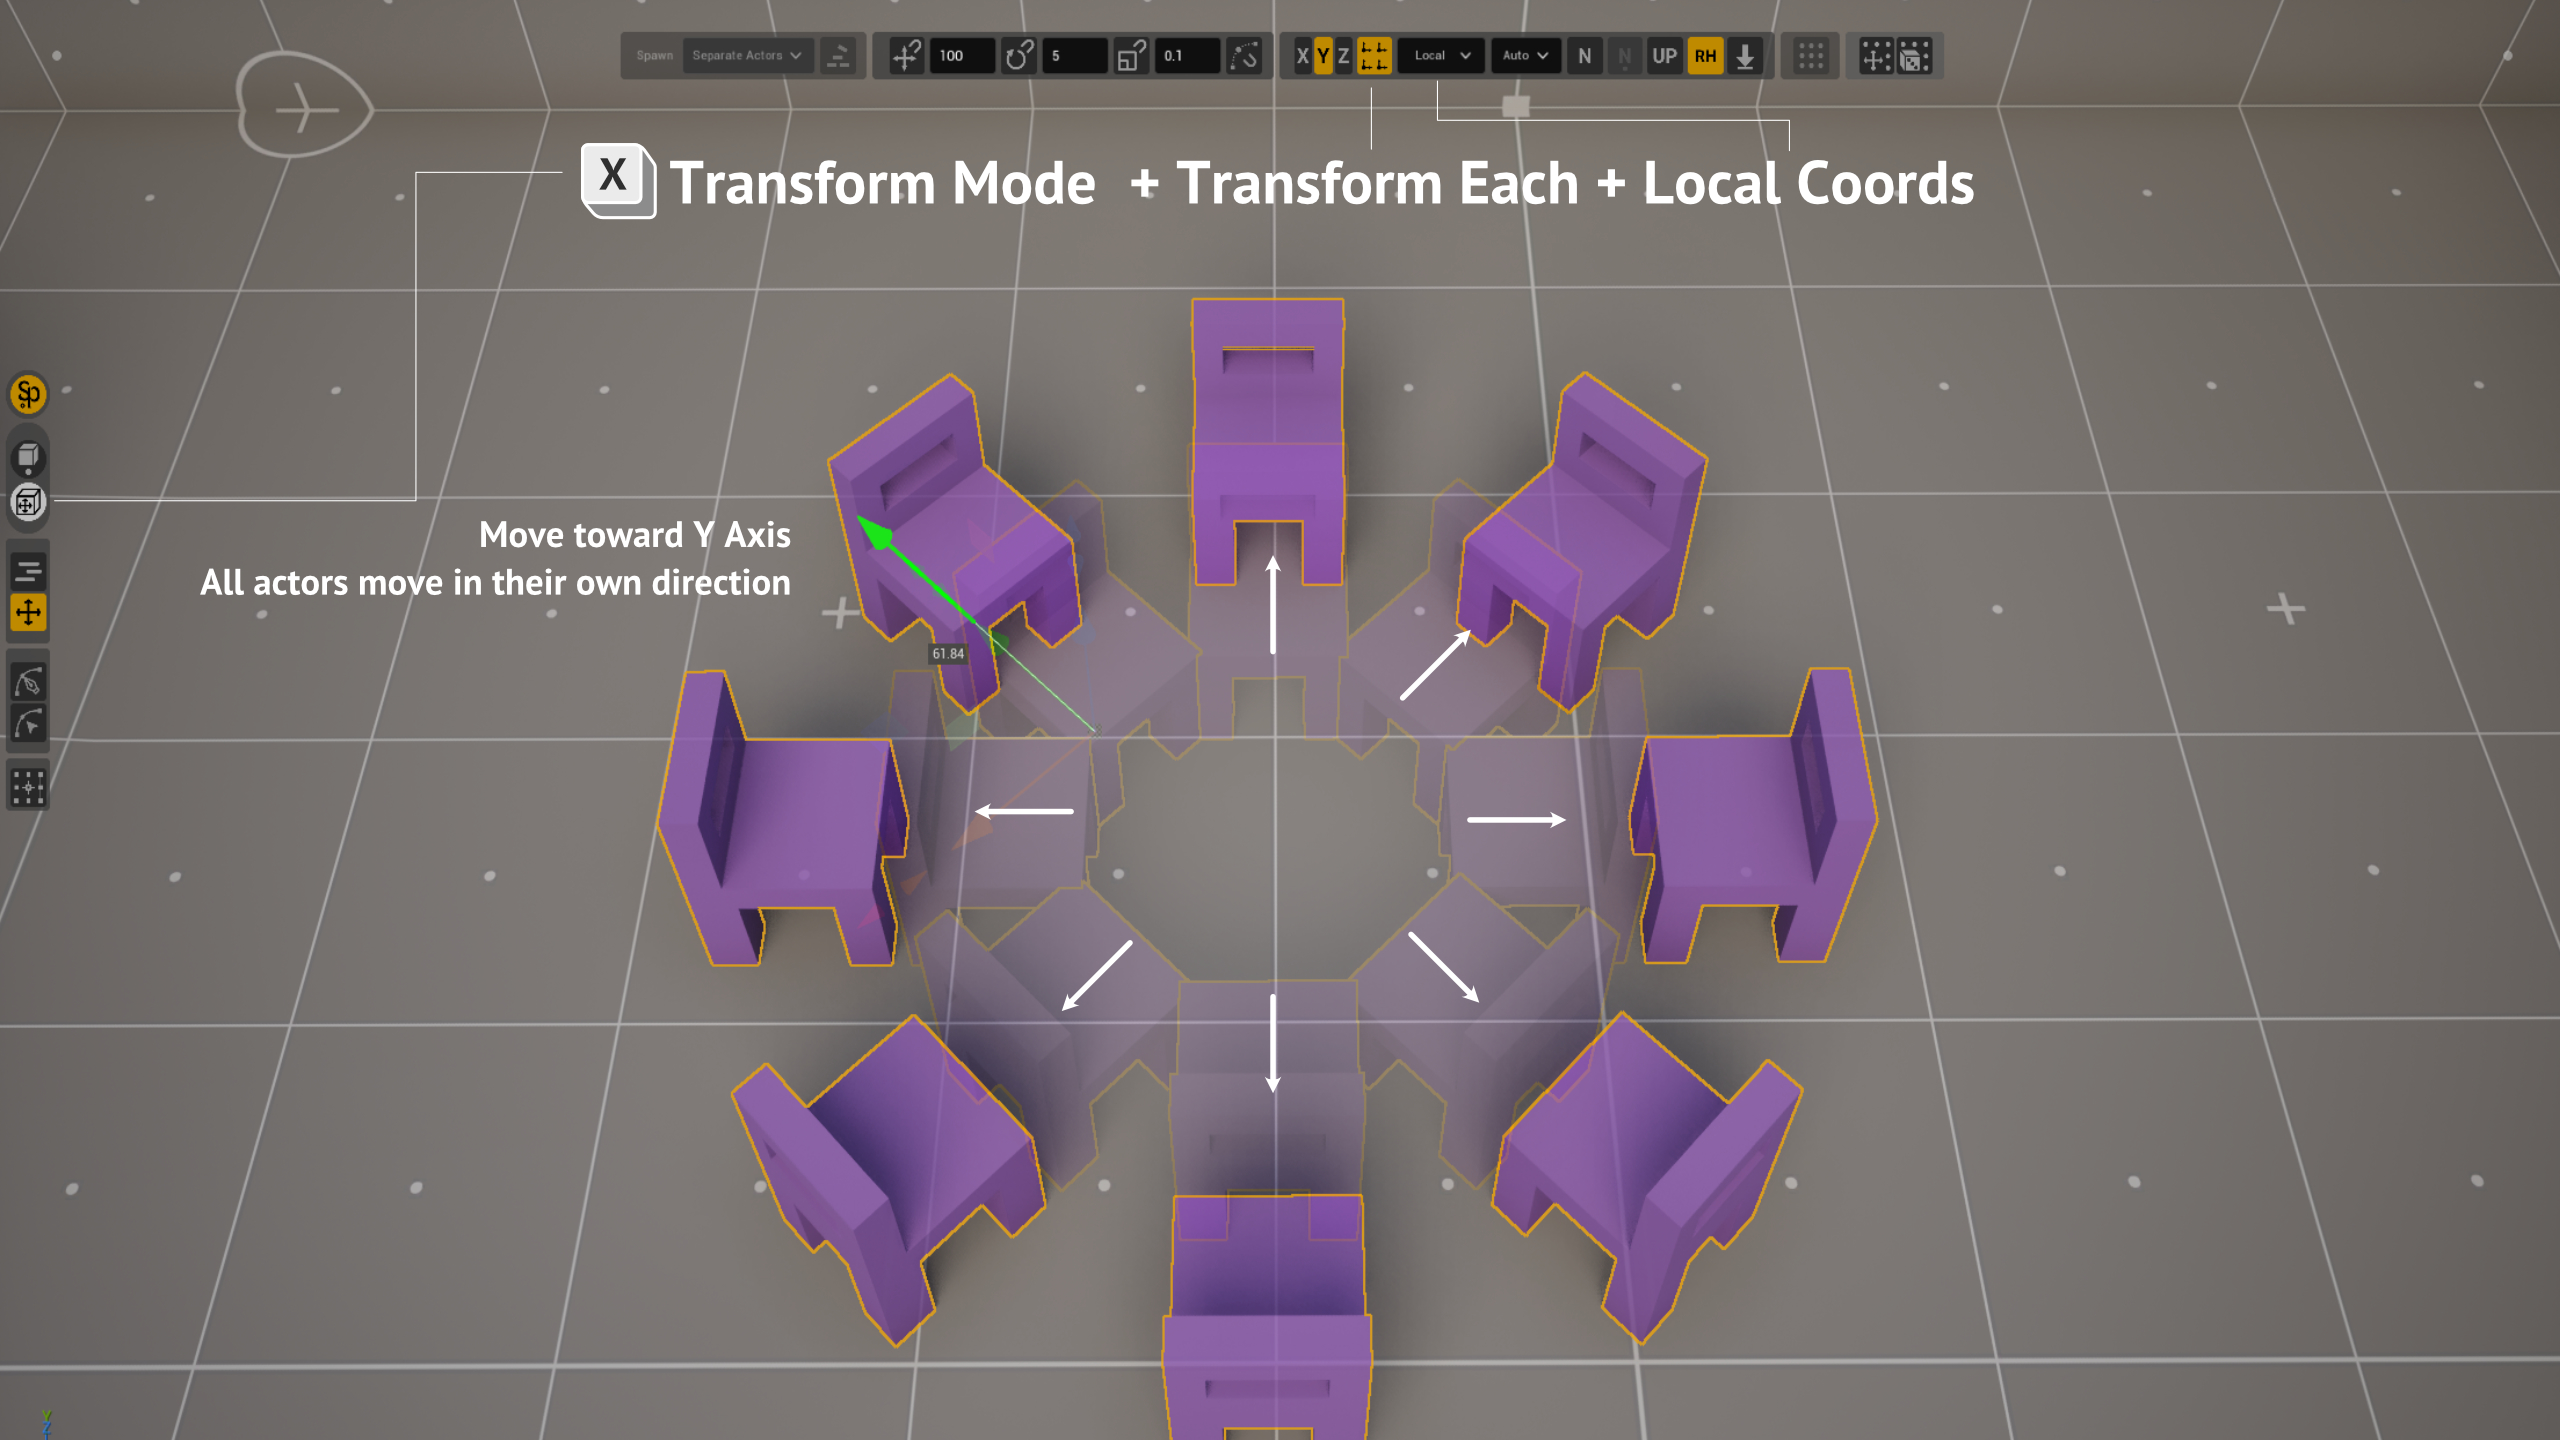
The ability to move several actors, each along its own direction.
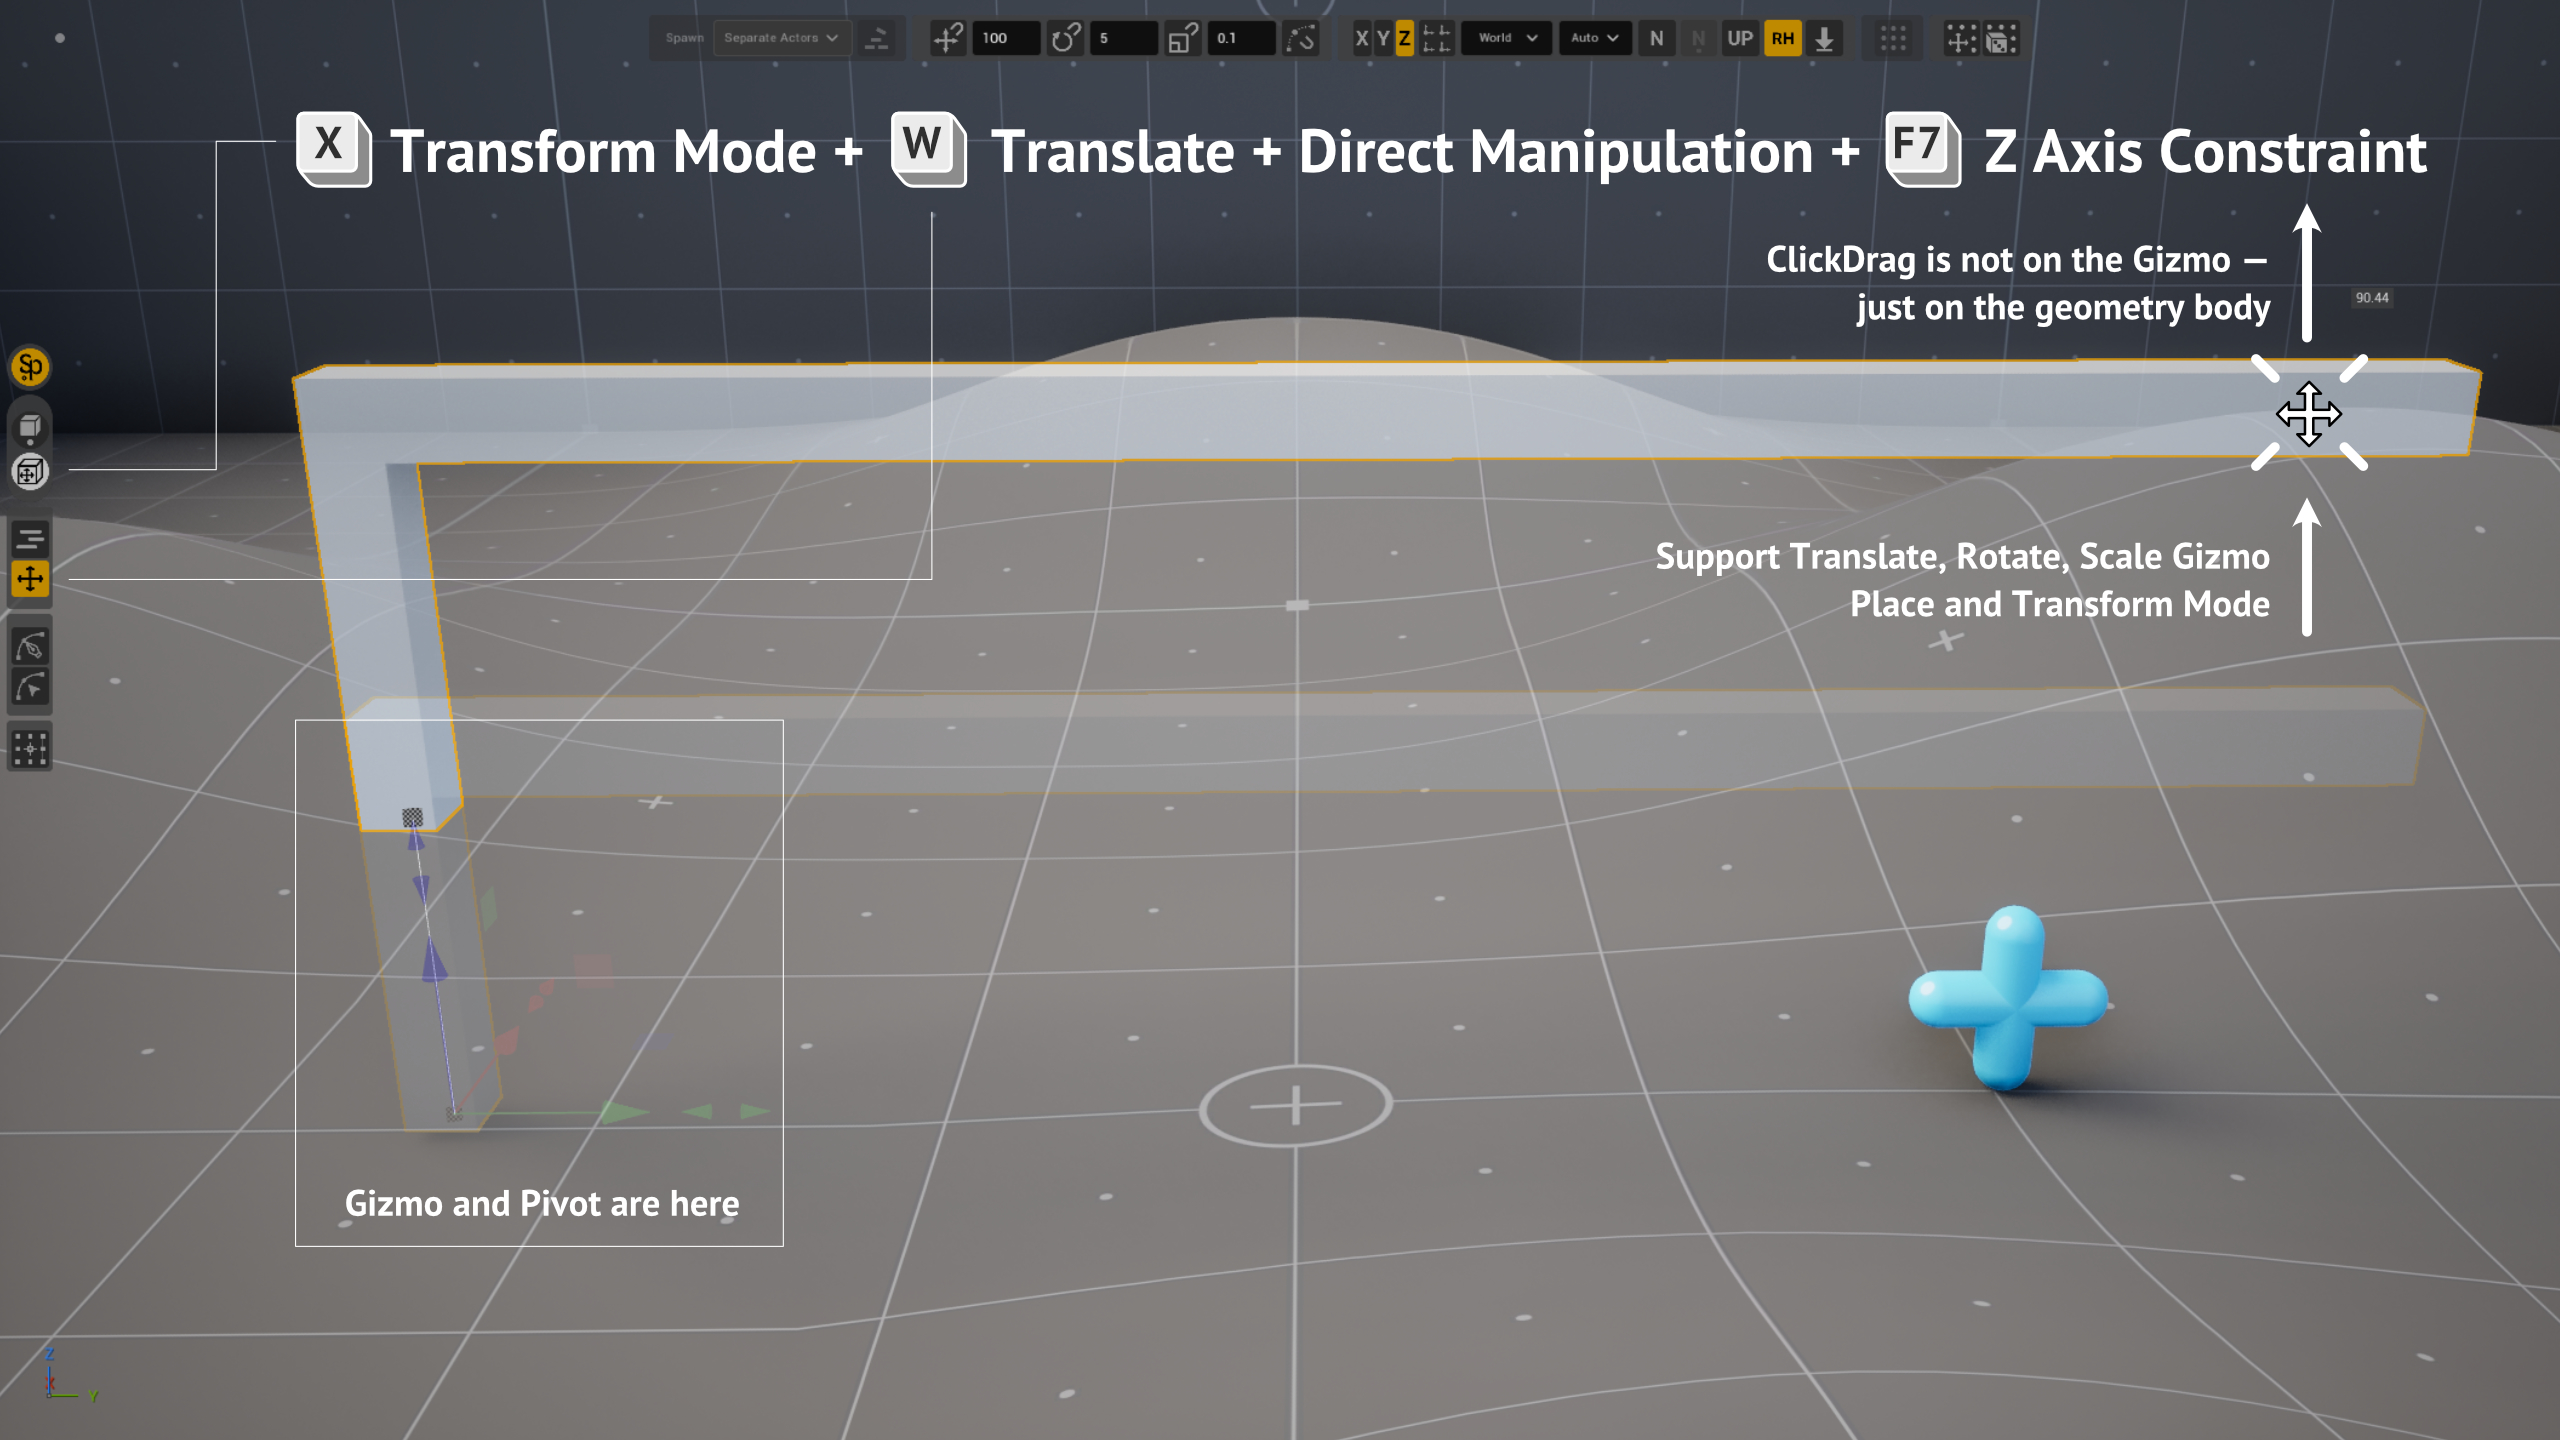
You don't have to use the gizmo or the parameter spinboxes to transform objects. You can just click-drag on the actor's body. This is especially handy with long actors, when the gizmo ends up outside the viewport.
SuperPlacer Early Access
A lot of SuperPlacer's additional features aren't documented yet and are under active development.